DIY Clay Leaf & Nature Impression Craft With Kids

This fun and simple clay project is great for beginners and children alike. The best part is that each of these clay leaf impressions can be unique and done in a few minutes.
Disclosure: This post may contain affiliate links when clicked, we may earn a small commission at no additional cost to you. Read our full privacy policy.
Recommended Supplies
- Regular Clay, Air Dry Clay or Polymer Clay: We are using Crayola air dry clay for this project at home.
- Wooden Skewer or Straw
- Variety Of Leaves With Fun Textures
- Cookie Cutter or Circular Lid (optional)
- Two Wooden Rulers or Paint Sticks Taped Together
- Rolling Pin or Wine Bottle
- Work Surface: coated cardboard square, canvas, parchment paper or wax paper
How To Make Clay Impressions
Before You Begin
Decide on the thickness of your ornament, clay piece or pendant. A 1/4″ thickness is a good target.
Search for different leaves and textures to use in your own yard. If creating clay dishes, search for larger leaves such as a maple leaf to use.
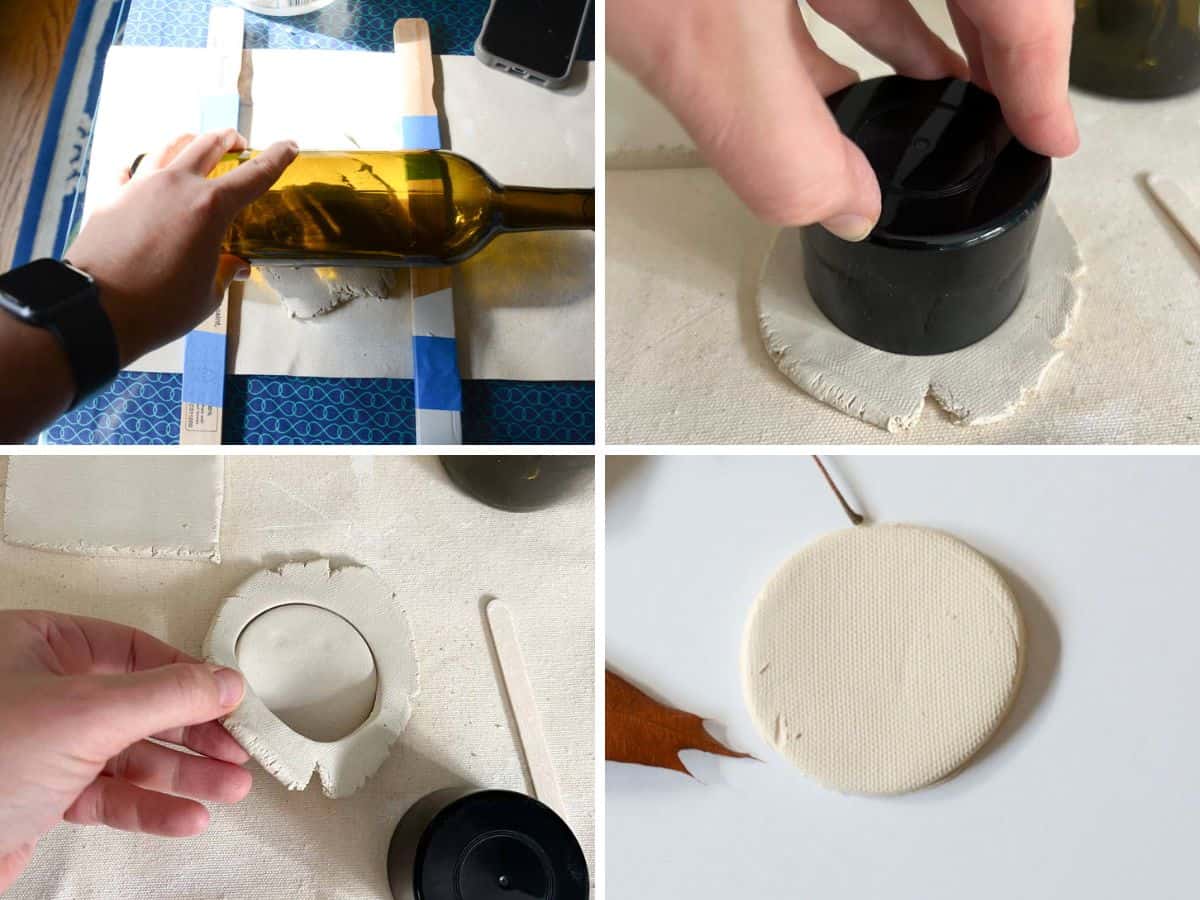
Step 1: Create A Flat Clay Slab
- You can do this by taping rulers or paint sticks together.
- Wedge your clay and place a ball of clay in between the guides.
- Roll a slab using a rolling pin or wine bottle.
- Once your clay has an even thickness, use a cookie cutter or lid to create a shape of your choice. Remove the excess clay and save it for clay crafts.
Optional: Add A Hole For Hanging
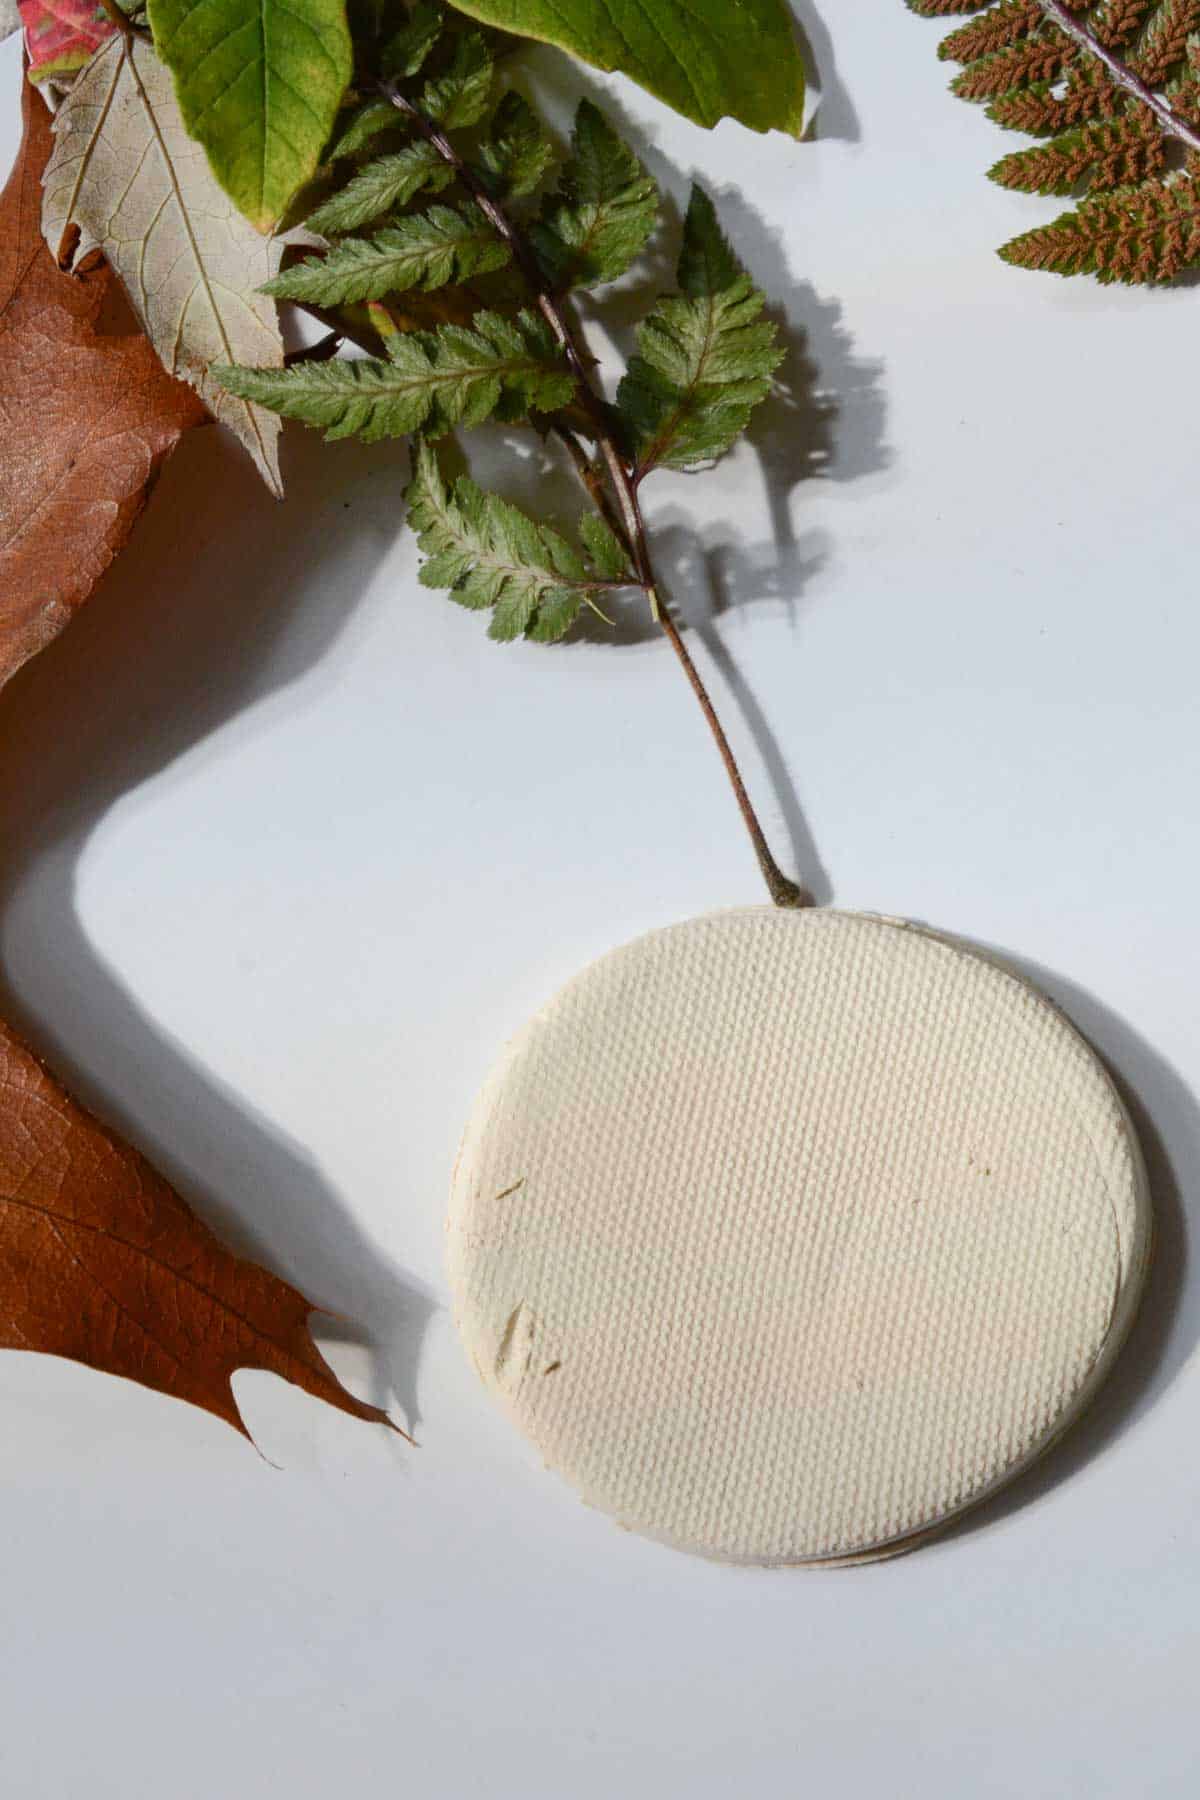
Use a skewer or straw to add a hole. Make sure to leave enough space so that the clay won’t break when you hang your clay leaf print.
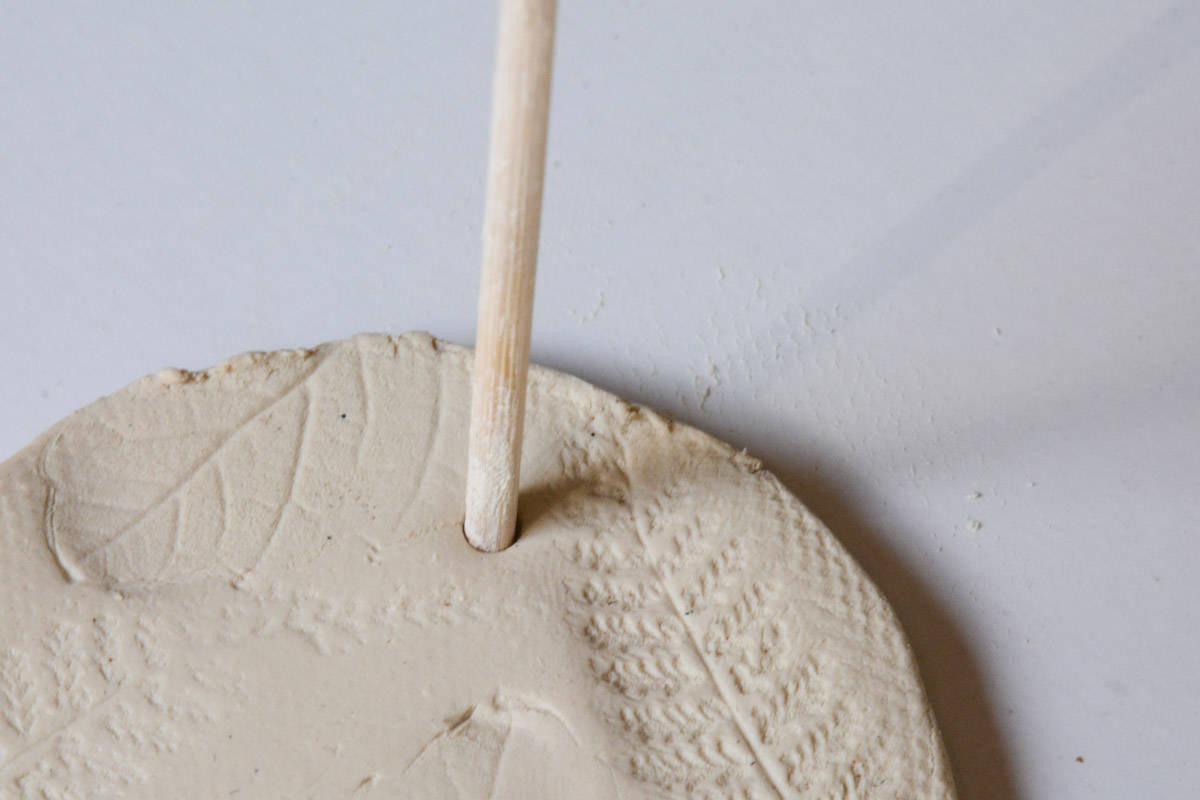
You can do this step at any time during the process, but it may be easier to do it here so you can smooth out rough spots.
Step 2: Smooth Edges
Put a little water on your finger and smooth out the sharp edges.

Step 3: Find The Textured Side Of The Leaf
There are so many fun things you can do with the texture of leaves. It is such a great way to teach about this element of art. Have fun exploring the textures with children before starting to get the impressions.

Step 4: Press Leaf Into Clay
Carefully use your finger pads to rub and push the leaf on the clay. Just make sure to rub the whole leaf. You could even try to make a nature mandala design.
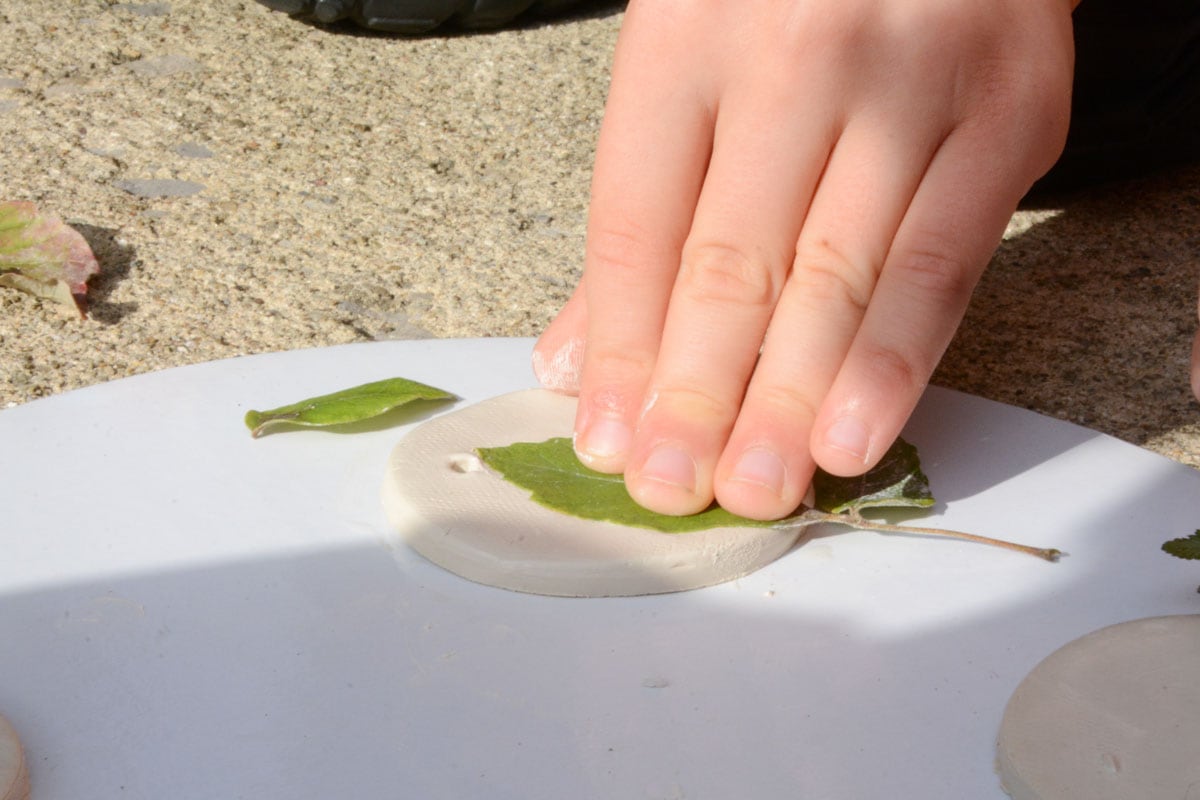
For clearer imprints, you can also use a rolling pin with wax paper on top to get the impression.
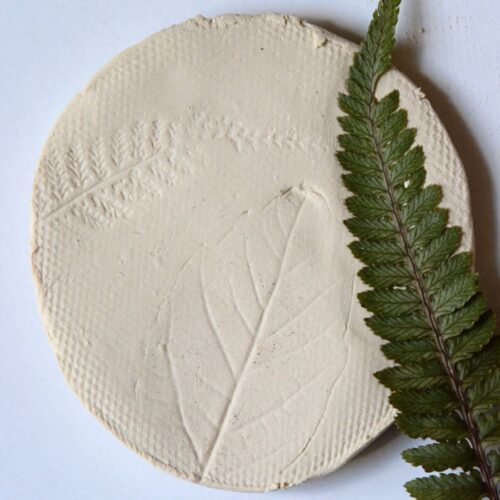
Step 5: Pull The Leaf Off
Small clay items work well with just one leaf impression, however, you can also overlap textures to complete your design.

Step 6: Let Dry
Air dry clay needs a least 24-48 hours to dry. Leave in a flat space. If using polymer clay you will need to bake your ornaments or clay leaf prints.

It is important to let your clay dry completely or cure before painting or adding a clear layer.
Step 7: Add Color
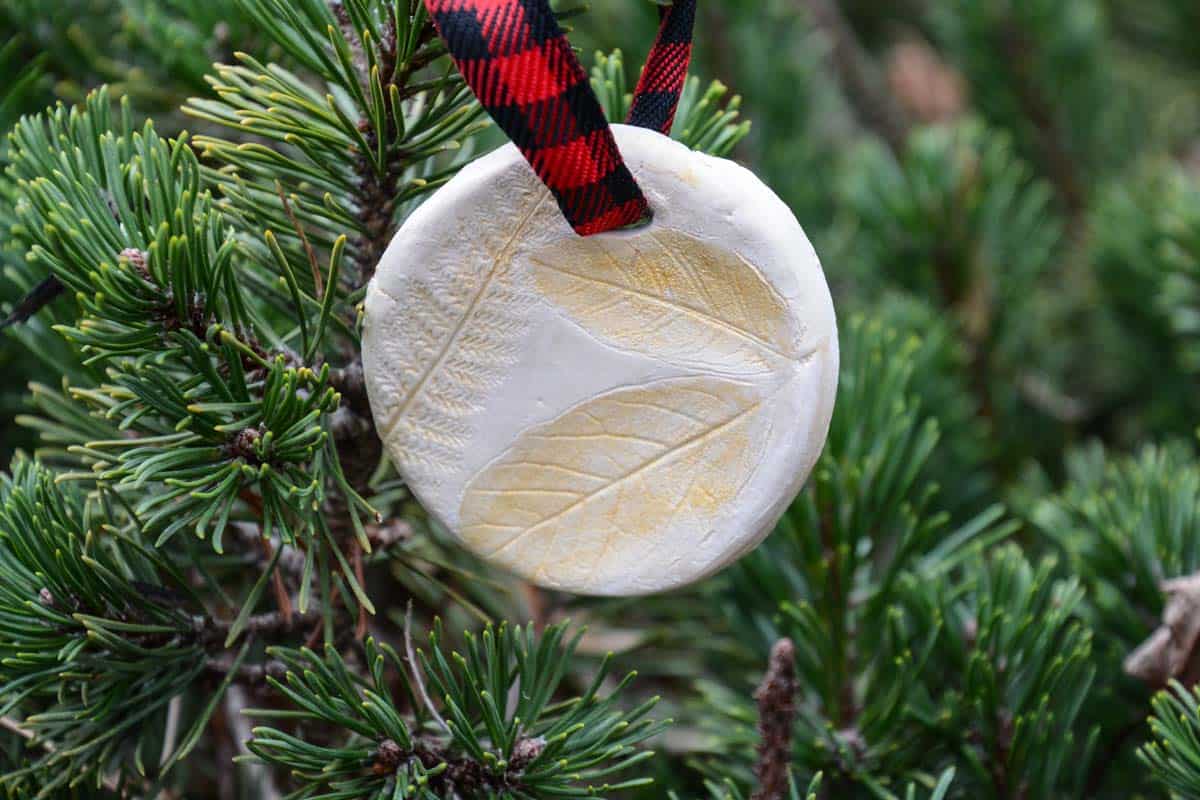
You could add a clear coat, paint with watercolor or acrylic paint or leave the clay as is. I would recommend putting some sort of clear coat if trying to hang on a tree or wear as a necklace.

Here you can see how we used metallic acrylic paint to add a little flair to our air-drying clay. You can water the paint down to emphasize the leaf impression more.
Other Options
- Instead of making leaf prints on a circular piece of clay, you could press the leaf in first and then cut around the outline of the leaf.
- You could also create a small bowl by slumping the leaf imprints.
- After you make leaf prints in clay, you could also try to make leaf prints on paper using paint or even washable markers.
- You could also use this art idea as a way to add texture to relief tiles.
Follow us on Pinterest, YouTube & Facebook for more free art and craft ideas!

Related Art Ideas
- How To Paint An Easy Fall Tree In Watercolor Paint
- Fun Textured Landscape Art Lesson For Kids
- How To Make A Pinch Pot At Home
Whether you’re an experienced crafter or just starting on your creative journey, this simple craft is a perfect way to explore texture with kids of all ages. These fun clay leaf impressions are a wonderful way to blend the outdoors with your creativity.
Do you like this art project? Please give us a 5-STAR review below ⭐️⭐️⭐️⭐️⭐️ and have fun being creative with your family.
How To Make Clay Leaf Impressions
Equipment
- Rolling Pin or Wine Bottle optional
- Cookie Cutter or Lid
- Wooden Skewer or Straw
- Work surface canvas, coated cardboard, parchment paper or wax paper
- Small container of water
- Slab Rolling Guide could be tape together paint sticks or rulers to your desired thickness.
Supplies
- Regular Clay, Air Dry Clay or Polymer Clay We are using Crayola air dry clay for this project at home.
- Variety Of Leaves With Fun Textures
Instructions
- Prepare Your Clay: Roll your clay into a 1/4-inch thick slab using rulers and a rolling pin.
- Shape Your Clay: Use a cookie cutter or lid to create your desired shape, then remove excess clay.
- Smooth the Edges: Dampen your finger and smooth out any sharp edges for a clean finish.
- Find the Textured Leaf Side: Explore leaf textures with children for added artistic fun.
- Create Impressions: Press the textured side of a leaf into the clay to make unique patterns.
- Lift Off the Leaf: Carefully remove the leaf from the clay; use one leaf for small items or overlap textures for a unique design.
- Allow to Dry: For air dry clay, wait 24-48 hours; for polymer clay, follow baking instructions on the packaging.
- Add Color (Optional): Paint with watercolor, acrylic paint, or leave as is. Consider adding a clear coat for ornaments or necklaces.
Notes
- You can modify this craft by cutting around the outline of the leaf, making slump dishes and painting in a variety of ways.