Easy Word Art Project Idea For Kids
Are you looking for a fun way to create word art with your students? This art lesson is a perfect way to analyze how artists use letters and words to create unique word art ideas and is so much fun.

Disclosure: This post may contain affiliate links when clicked, we may earn a small commission at no additional cost to you. Read our full privacy policy.
Artists That Use Words In Their Artworks
- Barbara Kruger
- Ed Ruscha
- Mel Bochner
- Illuminated Letters
- Bob and Roberta Smith-Make Art Not War
- Guerrilla Girls
- Martin Creed
- Paul Klee
- Jasper Johns
- Robert Indiana
Depending on the age of the students you are working with, you may want to explore some of the following artists who use words in their artworks.
What artists did we use as inspiration?
- Jasper Johns: known for his Flag art, but also for his letters and numbers paintings.
- Robert Indiana: is known for his Love artworks
- Pop Art Movement
Why tie these two artists together?
Both artists have artworks that use letters or words. They are great examples of the Love sculpture and Jasper Johns ABC artworks to ask kids to compare and contrast the differences in the works of art and how artists might use words to convey ideas and thoughts.
You can also tie in another artist, such as Andy Warhol. The grid idea and bright colors give a nod to the Pop Art Movement.
RELATED JASPER JOHNS PROJECT – Easy Alphabet Painting For Kids
Questions To Ask Kids
- Why do you think Robert Indiana used the word love?
- Why is the sculpture so large?
- What word would you want to make a sculpture about and why?
- Would your sculpture be large or small?
- Why do you think Jasper Johns made some letters harder to read?
- Would you ever create a hidden message in your art or make some letters more important than others?
This art project could be the start of a unit or just one project within a curriculum. The best part is that children will get to come up with their own words that describe their personalities.
These can also be given as great gifts to family members. Encourage kids to pick a word art idea that might mean something to their families.
Project Modification Ideas
All art activities always do best when people add their own twists. You do not have to do this collage method, but you could use this art lesson as inspiration for your own wonderful art project.
Check out this completely different way to use wooden letters to create unique canvas word art.
- Instead of colored markers, you could use colored pencils or acrylic paint.
- You could take this project a step further by having each student create only one letter and incorporate them into a collaborative art piece.
- If you are limited on time, a great idea is to work on watercolor paper and fill in the letters with oil pastels. Watercolor paints can then be added to the white spaces. A resist technique is a fun activity for young children
- Have kids draw their own bubble block letters.
- Use words with 3 letters and add punctuation instead of a four-letter word.
- Use your own color scheme ideas.
- Kids could choose most colors with emphasis on the contrast between the letters and the background.
- Use different materials for color (ex: mix tints and shades with tempera paints instead of tissue paper and sharpies).
What age can an artist easily complete this collage?
This art project for kids can be done with second graders and above. It is a fun way for children to express a feeling, word or idea that showcases their personality.
We think this lesson would also work well with middle school students because there is still a lot of choice in the final product they produce. And if we know one thing, middle school kids want to feel in charge of the end result during art class.
Recommended Supplies

Links for similar products are at the end of the post.
- Letter tracers
- Bleeding tissue paper: You can use regular tissue paper but bleeding tissue paper allows the bright colors in the background to blend together
- 9 x 12” heavy white drawing paper
- Glue water mixture: See below for how to make a good glue mixture for kids to work with.
- Permanent black marker: We love using a thicker chisel tip
- Colored Sharpies or washable markers: If you can get this 24-pack of colored Sharpies kids love the color choices. The tips are a good size for them to be able to add extra details and designs to their letters.
Tools
- Pencil
- Paintbrush
- Ruler or 9 x 12” paper cut in half long ways and one cut in half the other way
Why use tracers for this project?
I am normally not a fan of tracers. However, since there are so many other artistic choices being made in this project, the tracers allow the younger students to feel successful and still work on fine motor skills. Being able to hold the tracer and use a pencil across the midline is a skill that some children are still working on developing.
You do not have to use tracers. Students could make their own bubble or block letters. However, if you have a variety of letter tracers, students do love mixing and matching the different fonts to create a fun word.
Tips For Drawing Bubble or Block Letters
- Write letter regularly
- Trace around the letter with a lot of space
- Erase the middle letter
- Show how different styled letters can be made by using different lines
How to make a glue water mixture?
In small cups mix 1 part glue with 1 part water. Before kids use this you may have to have them stir it with their brush. For this project, washable school glue should work fine to do this collage technique.
We like using these small containers with lids to help distribute paints and other mixtures.

How To Make An Easy Word Art Collage For Kids
Please note that each day is about a 30-40 minute “class” or studio session. Depending on the child, this may vary to completely finish the word art project.
What should an adult do before the art project begins?
You will want to precut a manila tag board or construction paper in half vertically and another set horizontally. This will allow kids to easily trace a grid pattern on their own project. If you do not want to do this, you can always use rulers and measure or fold the paper to create 4 equal quadrants.

Day 1: Sketch Out 4 Letter Word In Grid
After a discussion of the artists, brainstorm 4 letter words that children could make artwork about.
Step 1: Start with a 9” x 12” piece of paper.
You could line up half cut tagboard tracer to get a vertical line down the center of their page. Repeat the other tracer to get 4 equal rectangles on the page. Or use a ruler!
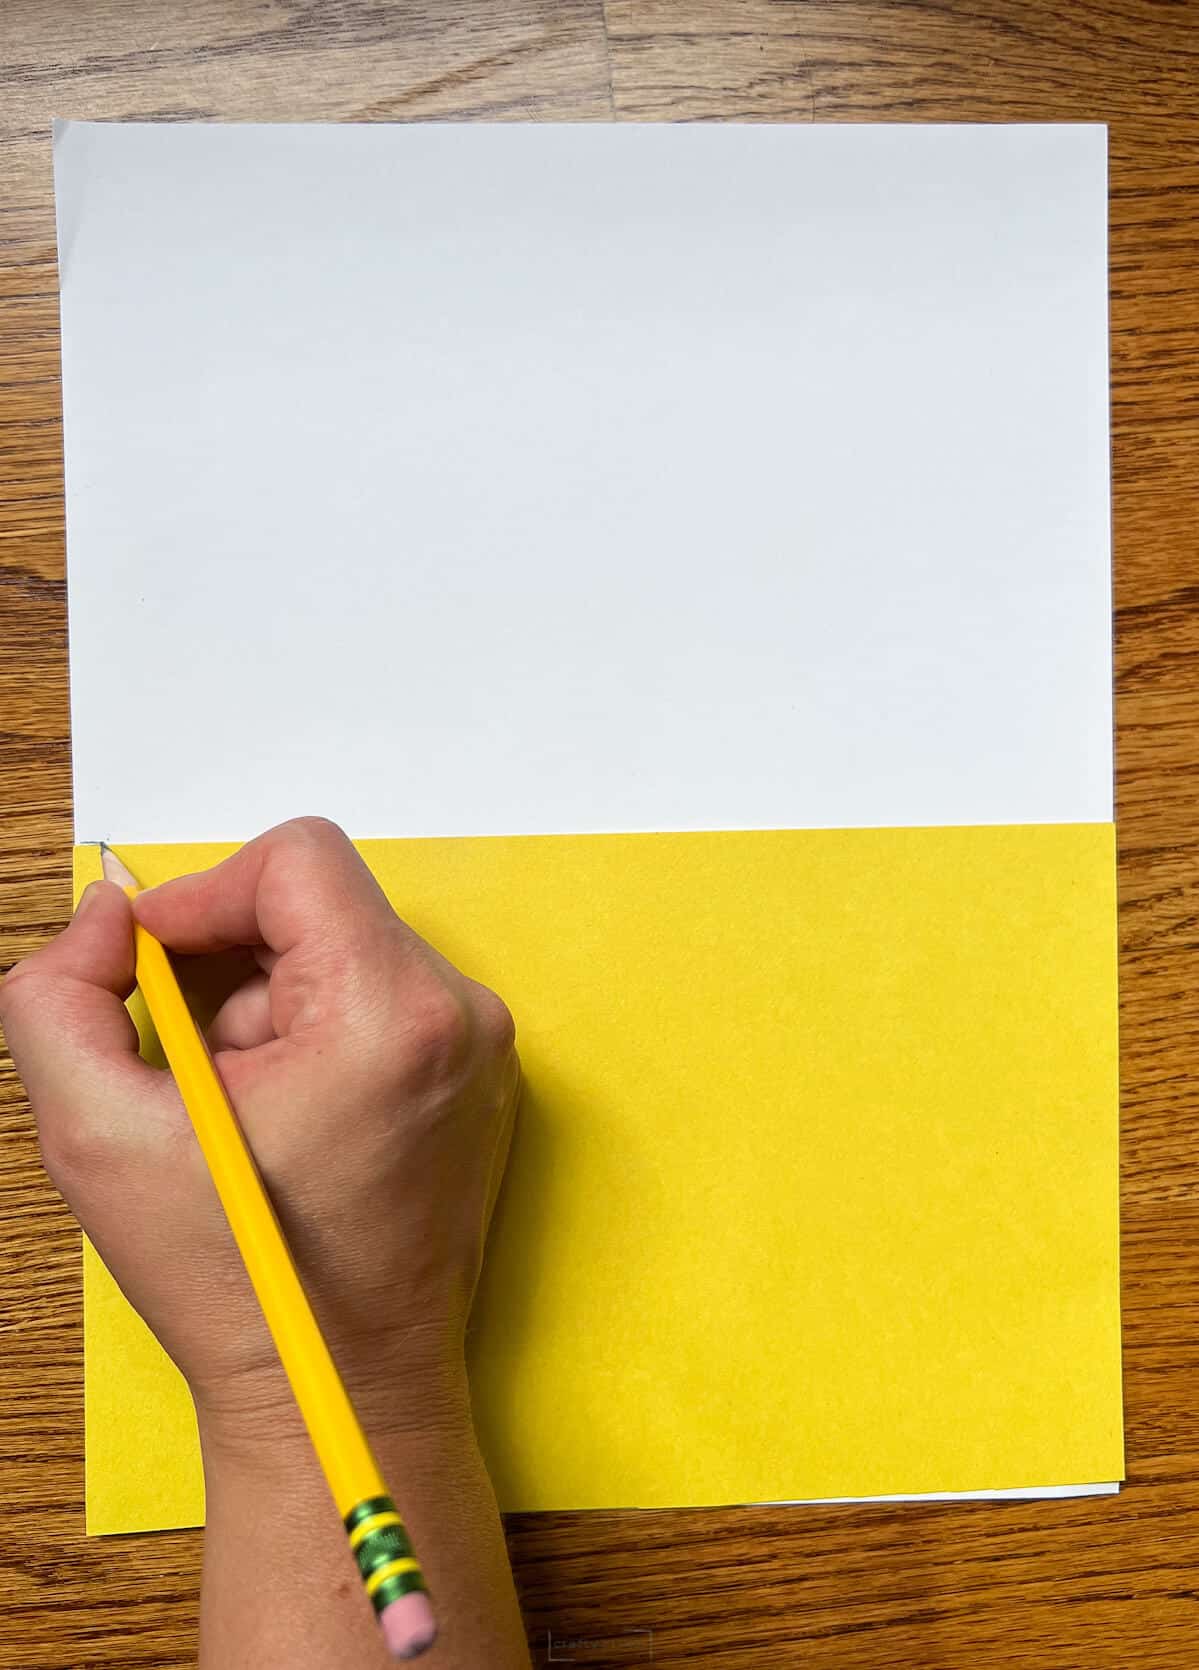
Step 2: Create 4 equal rectangles or grid on the 9 x 12″ paper.

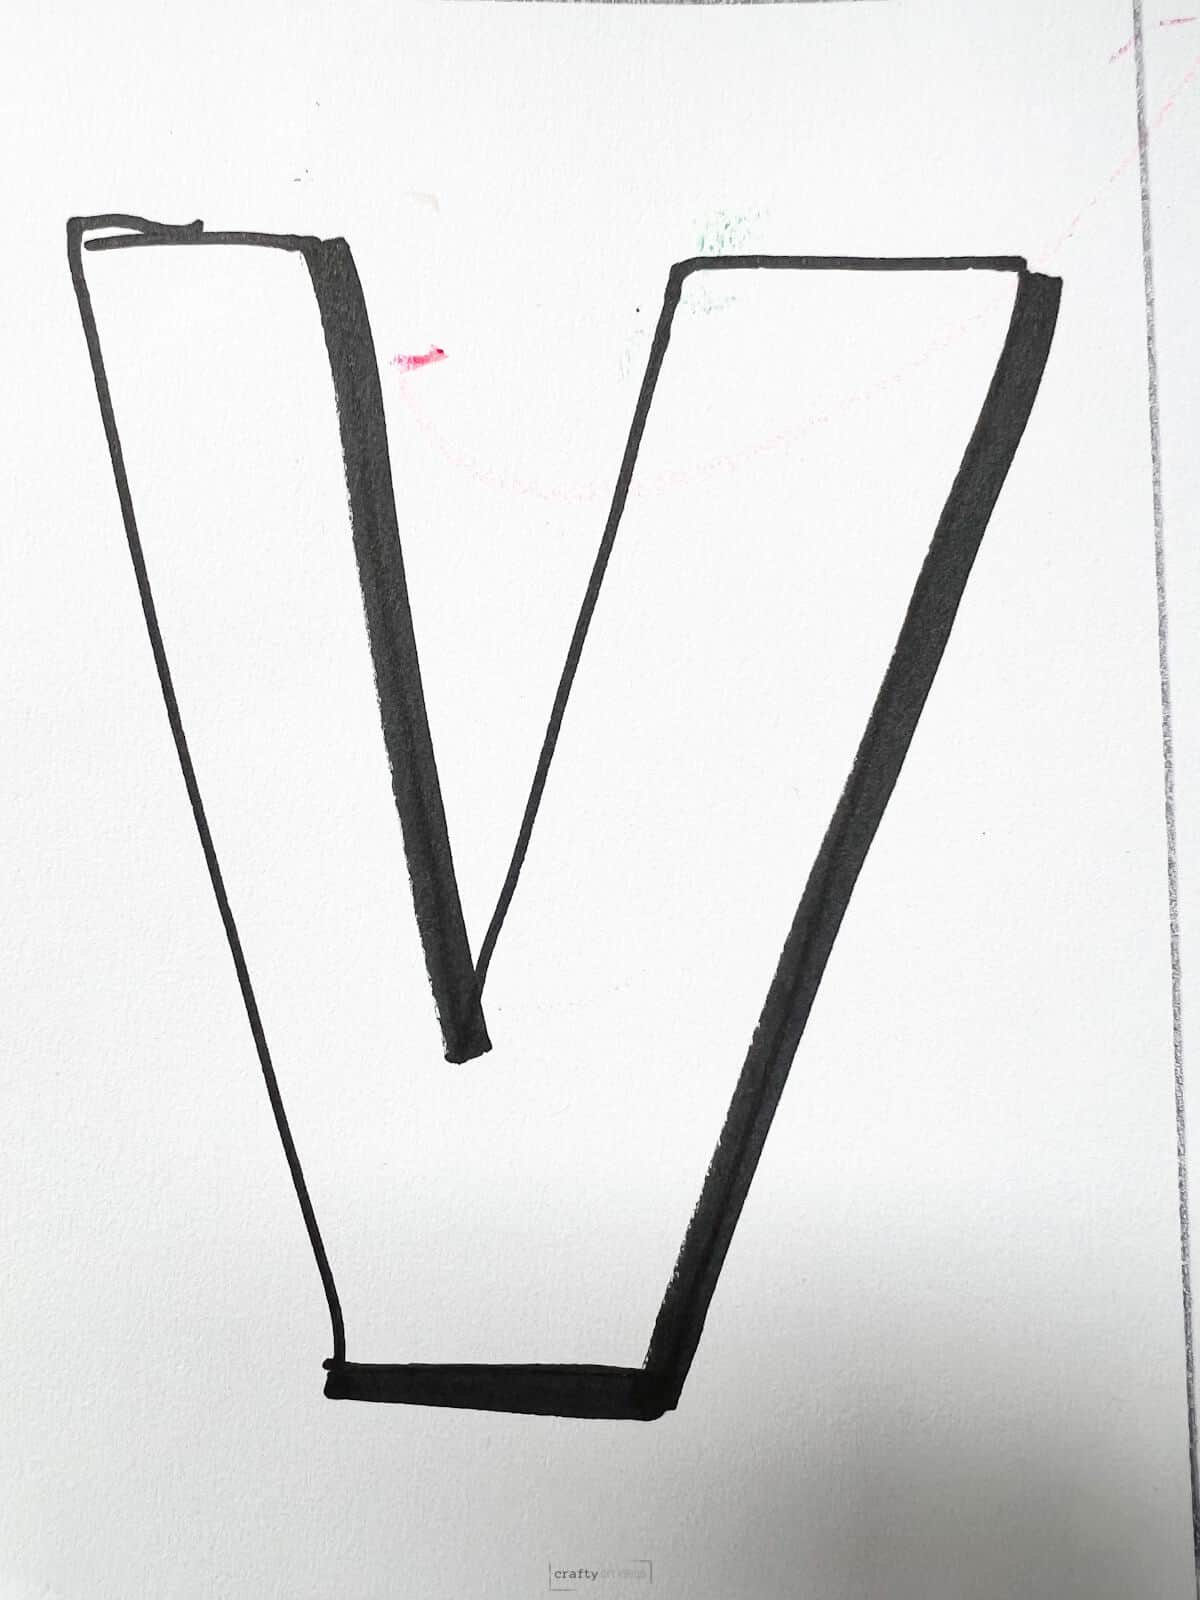
Step 3: Use tracers or draw bubble or block letters to get a drawing of their rectangles
Optional: trace with a larger permanent black marker and if the child is more advanced make letters appear more 3-dimensional with thicker lines in places.
Day 2: Begin Collaging With Tissue Paper In Backgrounds
Precut bleeding tissue paper into 4” x 6” rectangles and separate by warm and cool colors. Begin class by showing kids the color wheel and discussing warm and cool colors. This color wheel song is perfect for elementary artists to learn about basic color theory.
Step 4: Each child should pick 3 rectangles of colored tissue paper in either warm or cool.

Step 5: Rip the paper into small pieces. Jagged edges on the paper will work just fine, but keep the paper as flat as possible. Don’t let the kids crumple up the paper.
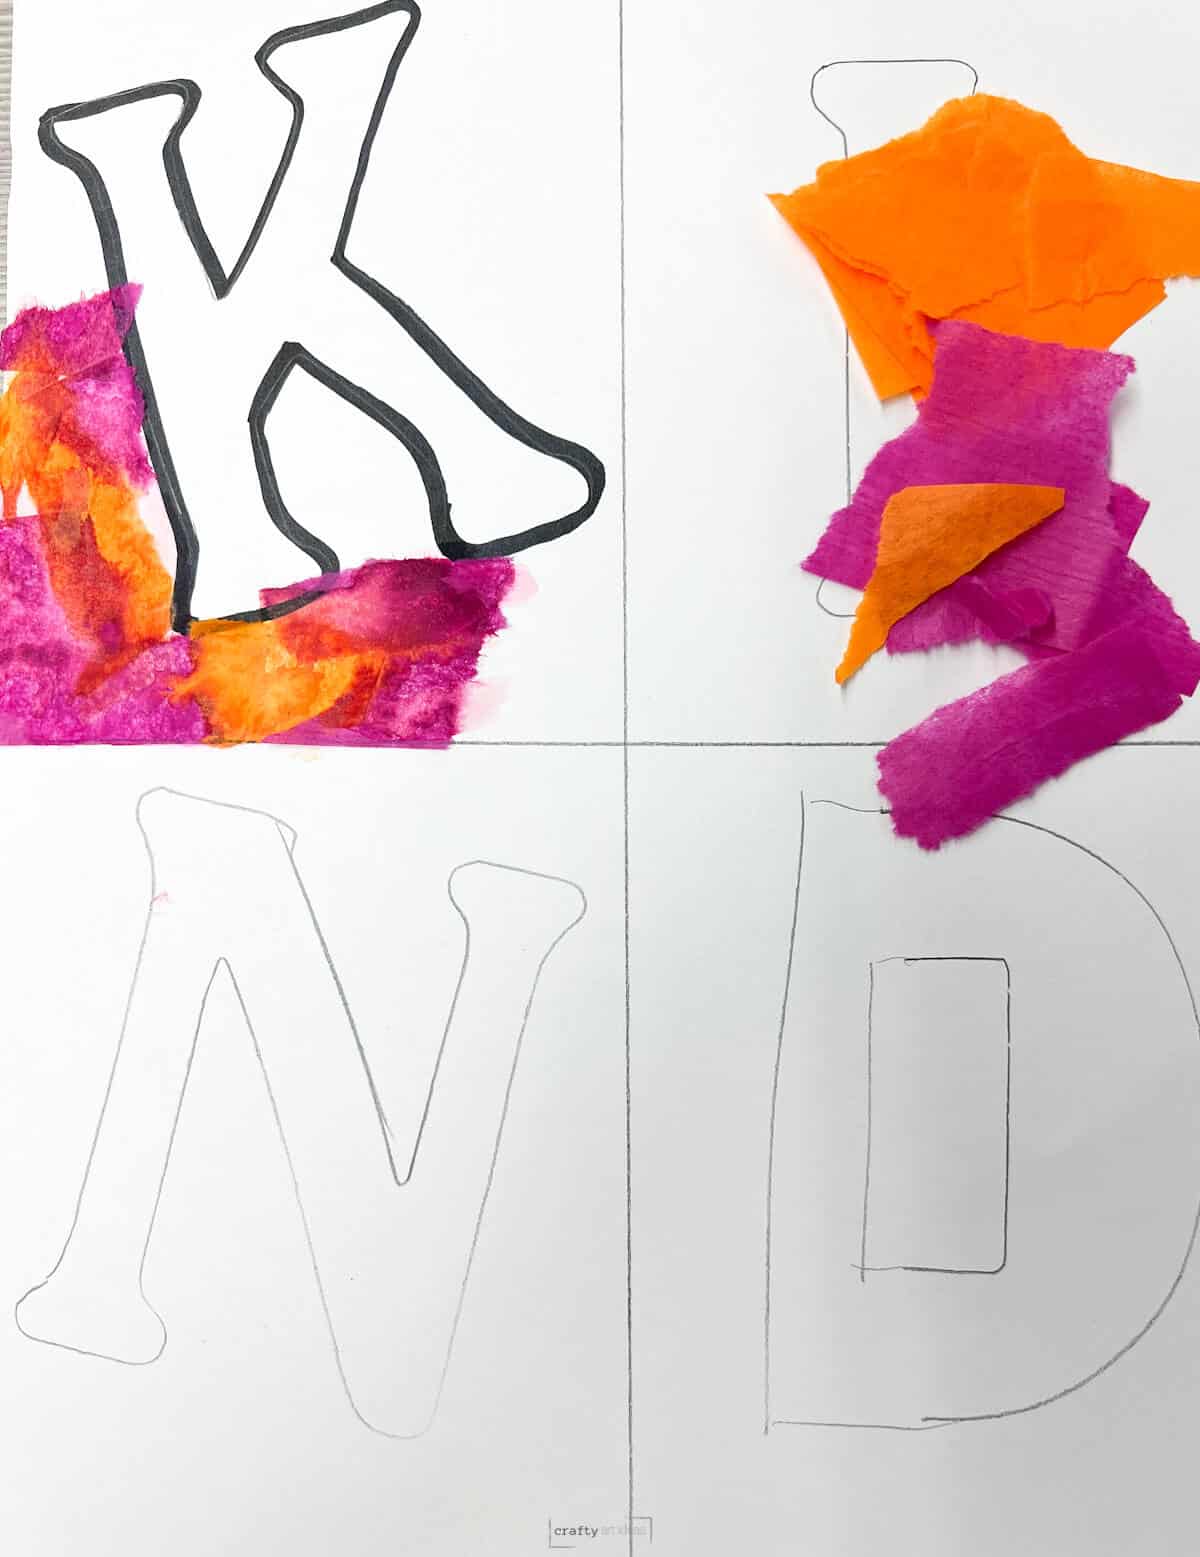
Step 6: Kids are to work in the background of the first rectangle.
Place one ripped tissue paper in the background and paint glue water on top. Showing kids how to “dab dab stroke stroke”.

Tips On How To Use Tissue Paper To Collage With Kids
- If students can’t get the paper to stay on top, have them paint the glue water down first and then stick the paper on.
- Make sure children understand that the paper needs to just be left to dry.
- They will not peel up the paper and they will see how it becomes almost like new paper when dry.
- If this is too messy, you can just use water with bleeding tissue paper and take the paper off. You can read all about how to paint with tissue paper here.
Day 3: Continue Tissue Paper Collages in Opposite Color Scheme
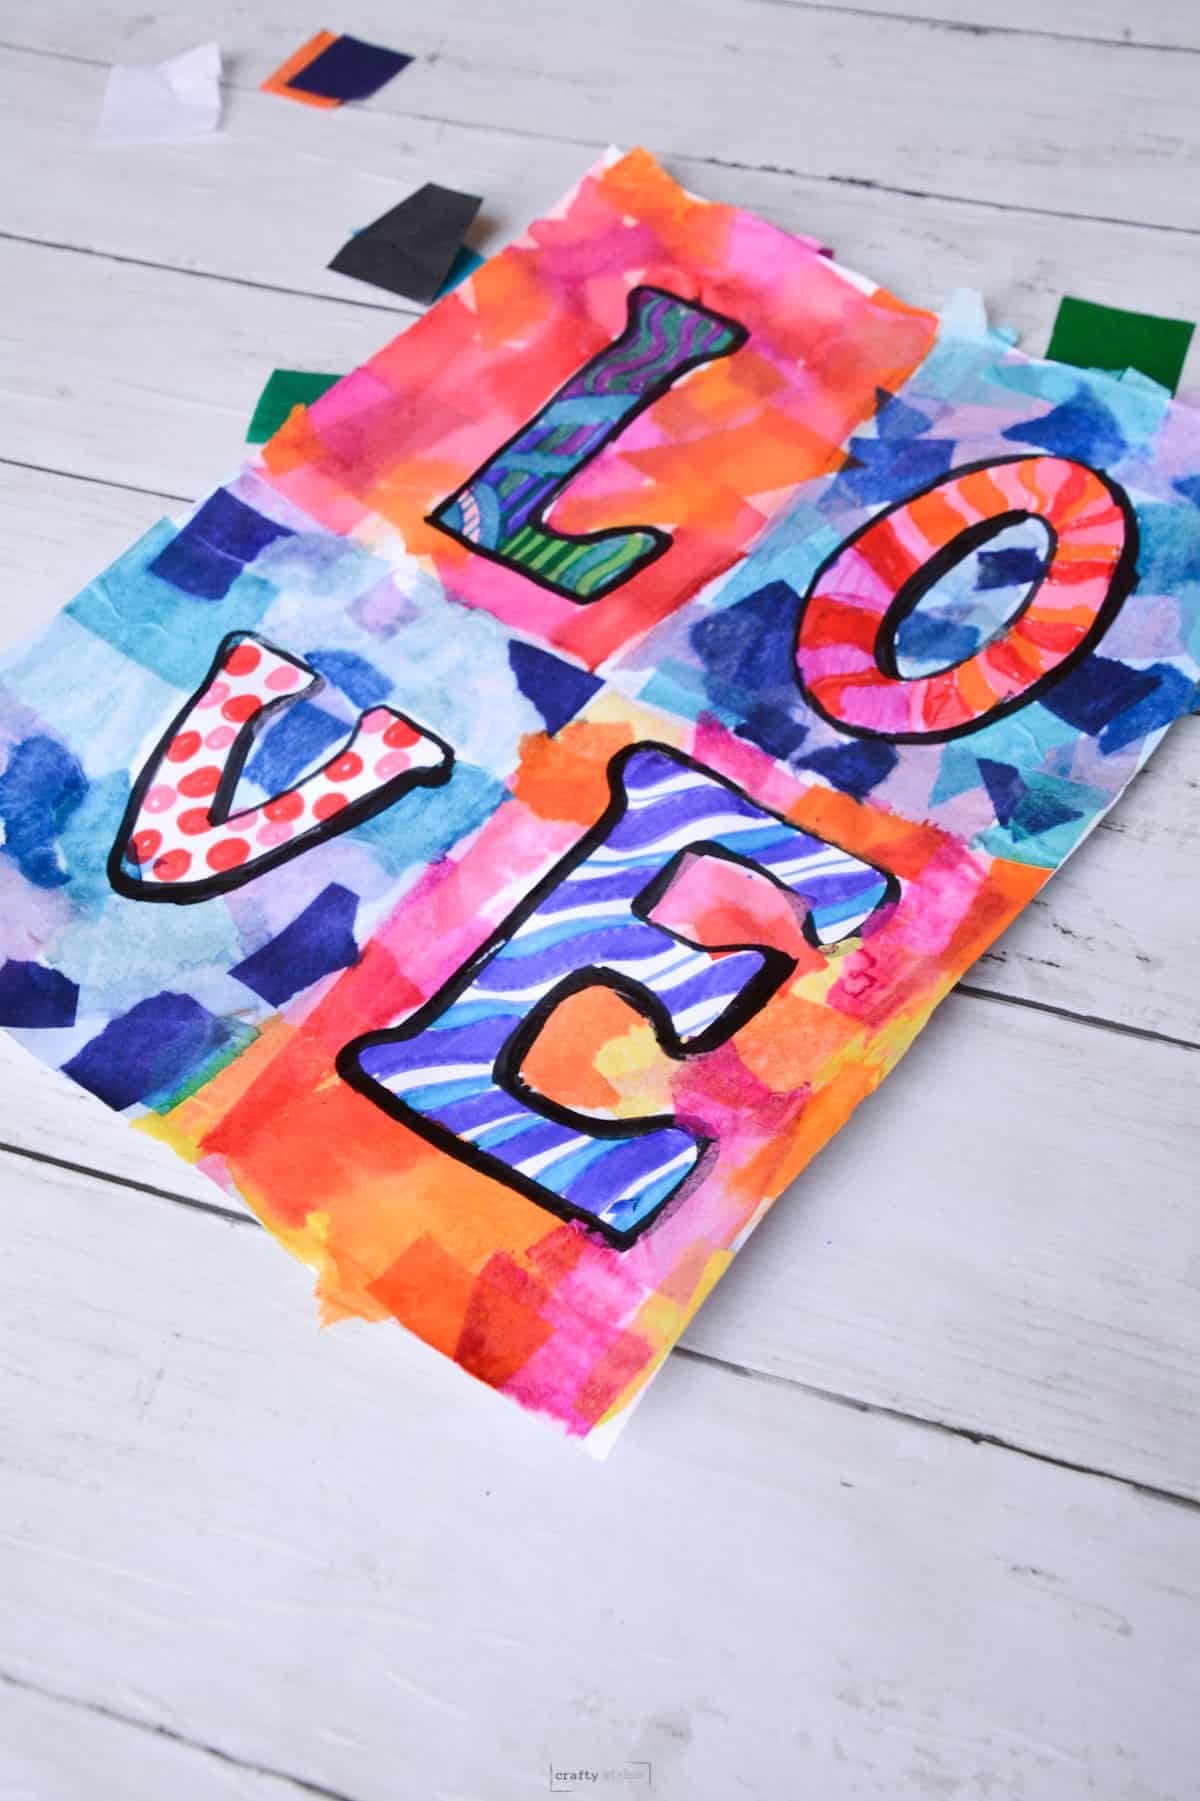
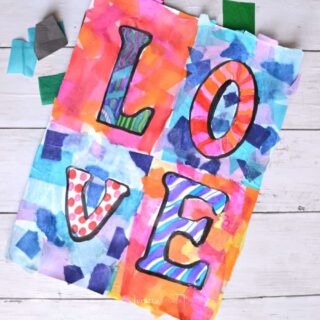
Step 7: Continue to work on the backgrounds of the letters. Kids should fill the rectangles with warm colors in the 1st and 4th letters and cool colors in the 2nd and 3rd letters (or the other way).

You want to create a checkerboard-like pattern in the backgrounds.
Day 4 and 5: Finish Collaged Backgrounds and Design Inside Of Letters With Markers
Step 8: Once tissue paper collages are done in the background, use markers in the opposite colors to design the letters. Encourage students to add different patterns to their word art creations.
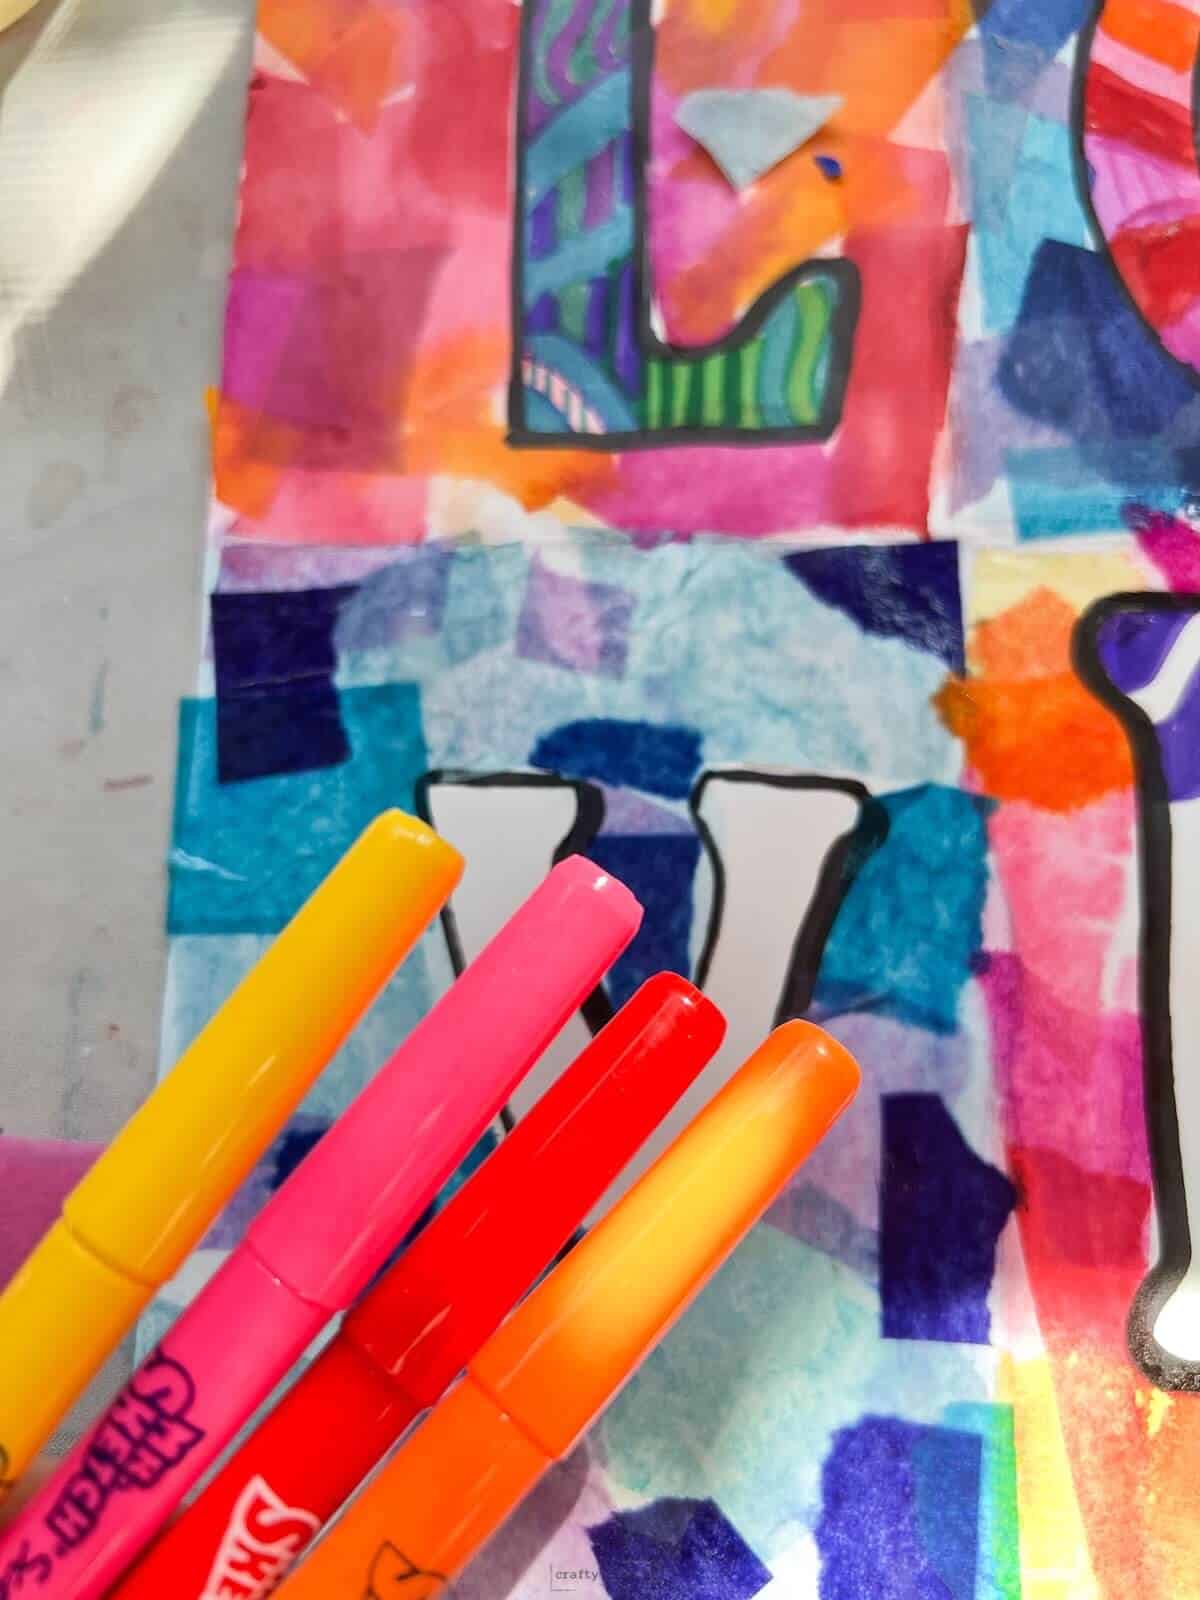
For example, the warm tissue paper backgrounds will get cool colored markers inside the letters in various shapes and designs. We just love the effect collaging or painting with the bleeding tissue paper.

Step 9: When all letters are finished, children may have to re-outline letters with a thick black marker. They can go over any places where the tissue paper accidentally got inside the letters.
We know this art project for kids has many steps. But when broken down into small art lessons, you can teach a lot. Have fun teaching about contrast, warm and cool colors, collage, and more.
Follow us on Pinterest, YouTube & Facebook for more free art and craft ideas!
Hang up your awesome elementary word art project for all to see!
Easy Word Art Project Idea
Equipment
- Pencil
- Ruler or 9 x 12” paper cut in half long ways and one cut in half the other way
Supplies
- Bleeding tissue paper
- 1 piece 9" x 12” Heavy White Drawing Paper or Tagboard
- Glue water mixture
- Permanent black marker
- Colored Sharpies or washable markers
Instructions
Draw Letters
- Show kids how to line half-cut manual to get a vertical line down the center of their page.
- Repeat with the other tracer to get 4 equal rectangles on the 9 x 12" white drawing paper.
- Use tracers or draw bubble or block letters to get a drawing of their rectangles
Collaging Tissue Paper In Background
- Pick 3 rectangles of color tissue paper in either warm or cool colors.
- Rip paper into small pieces. Work in the background of the first rectangle.
- Place one ripped tissue paper in the background and paint glue water on top. Showing kids how to “dab dab stroke stroke”.
- Continue to work on the backgrounds of the letters. Kids should fill the rectangles with warm colors in the 1st and 4th letters and cool colors in the 2nd and 3rd letters (or the other way).
Adding Color Inside Letters
- Once tissue paper collages are done in the background, use markers in the opposite colors to design the letters.
- Redo any black outlines that were covered with the tissue paper.
Notes
- You can trace with a larger permanent black marker and if the child is more advanced make letters appear more 3-dimensional with thicker lines in places.
- If you are limited on time, a great idea is to work on watercolor paper and fill in the letters with oil pastels. Watercolor paints can then be added to the white spaces. A resist technique is a fun activity for young children
- You can use a 3 letter word with punctuation or an image in the last rectangle.