
Easy Tessellation Art Project for Kids

This is one of those drawing projects that looks harder than it actually is! Kids are always amazed at the repeating patterns they can create by following this simple step-by-step tessellation tutorial.
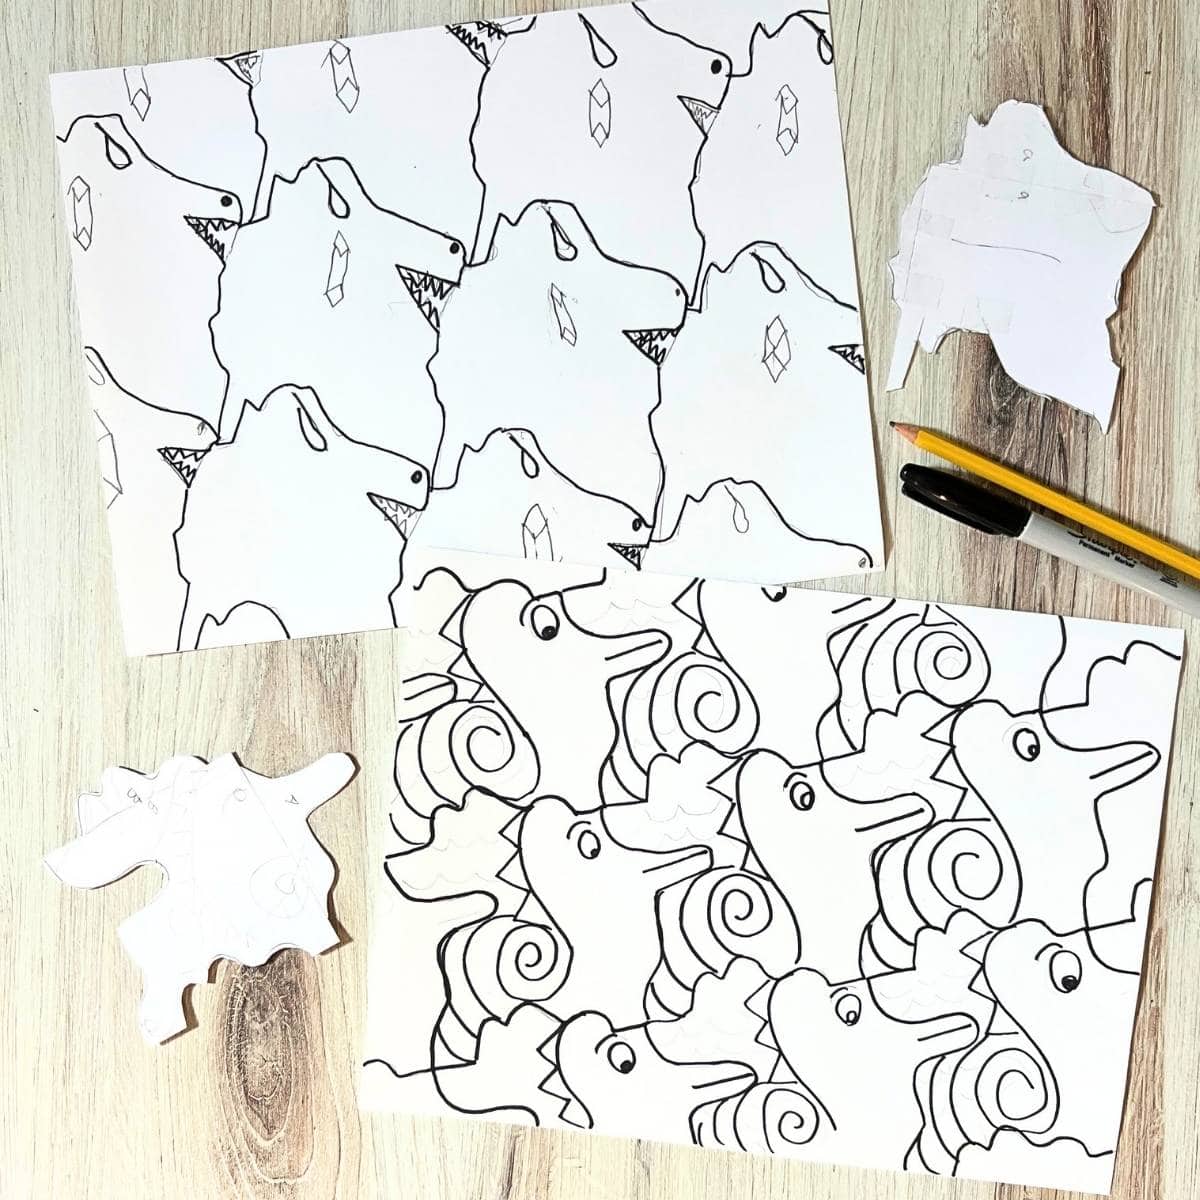
We love using famous artists as inspiration for art projects. This drawing idea is a great 4th or 5th grade art project and even for middle school artists. You can even simplify this for younger children by only changing one side of your template.
Why You Will Love This Drawing Tutorial
What Is a Tessellation?
A tessellation is a repeating pattern of shapes that fit together without any gaps or overlaps. You can find tessellations in everyday objects, such as floor tiles, brick walls, and patterned fabrics.
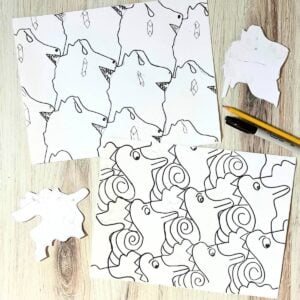
In this art project, kids will create their own tessellating shape and repeat it to fill their paper with a unique design.
Artist Inspiration: M.C. Esher
Dutch artist M.C. Escher is known for creating amazing artwork using repeating shapes, patterns, and optical illusions. Many of his tessellations feature animals, birds, and other recognizable objects that fit together perfectly.
Over the years, we have found that kids love looking at Escher’s drawings and trying to figure out how the shapes fit together.
Before starting the project, have kids look closely at his artwork. What shapes or animals can they find? How do the shapes repeat without leaving any gaps?
More Tessellation Artists to Explore
M.C. Escher isn’t the only artist who creates tessellations! Here are two contemporary artists worth exploring with kids.
Francine Champagne: This Canadian artist creates colorful tessellations featuring animals, people, and other recognizable objects. Her playful designs are great examples of how repeating shapes can become creative artwork.
Alain Nicolas: This French artist creates detailed tessellations featuring animals, people, and even letters and words. His artwork shows how repeating shapes can create surprisingly complex designs.
Supplies you’ll need
Disclosure: This post may contain affiliate links when clicked, we may earn a small commission at no additional cost to you. Read our full privacy policy.
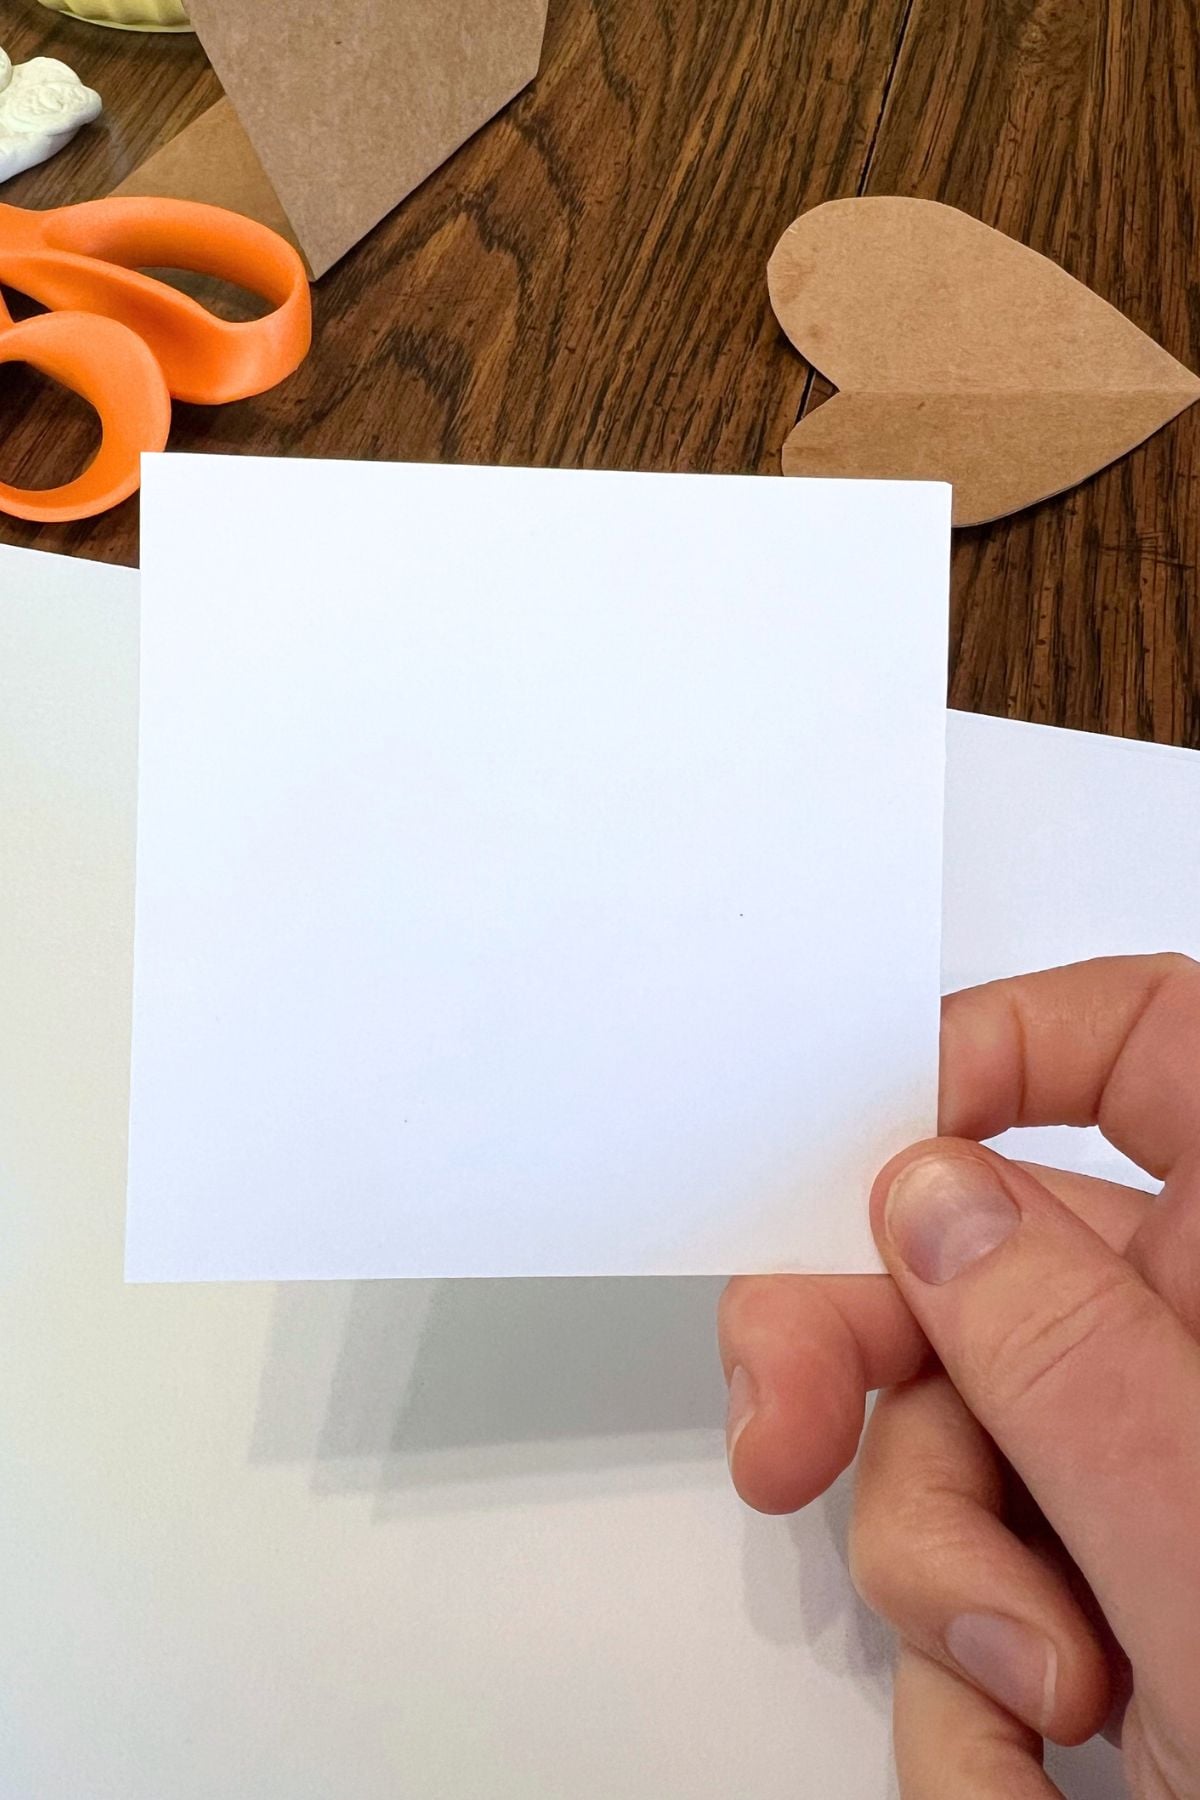
NOTES ON SIZE: These drawings do take time or several classes to complete on 9″ x 12″. You could try to use smaller templates and smaller drawing paper to make the project go faster.
Art Teacher’s Take 🎨
Encourage kids to keep their lines simple. If the lines are too complicated, they will have a harder time cutting out their shapes and tracing them to create their tessellations.
How to Make a Tessellation Drawing For Beginners
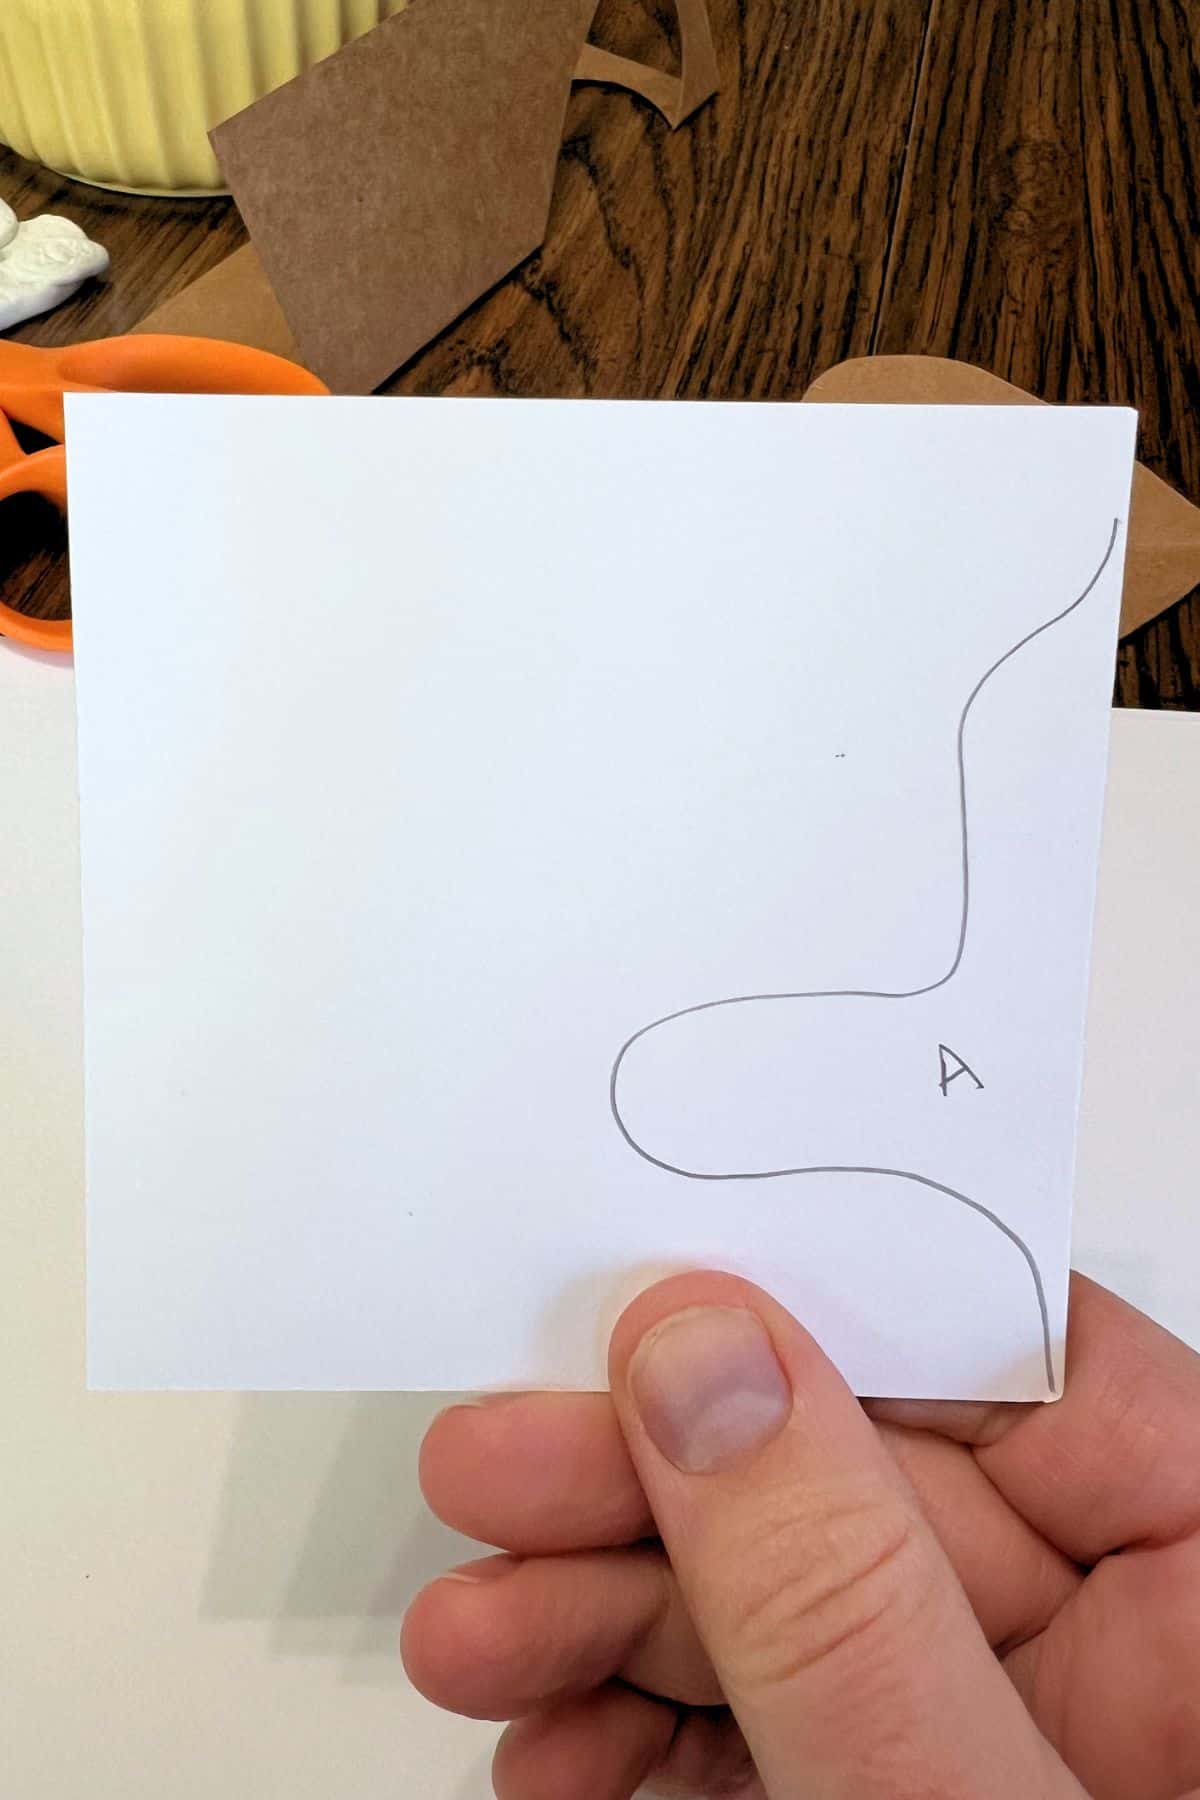
Step 1: Draw A Simple Line On The Left Side of the Template
Draw a simple curved or angular line that starts and ends on the same right side edge of your Post-it note. Make sure the line does not cross over itself.
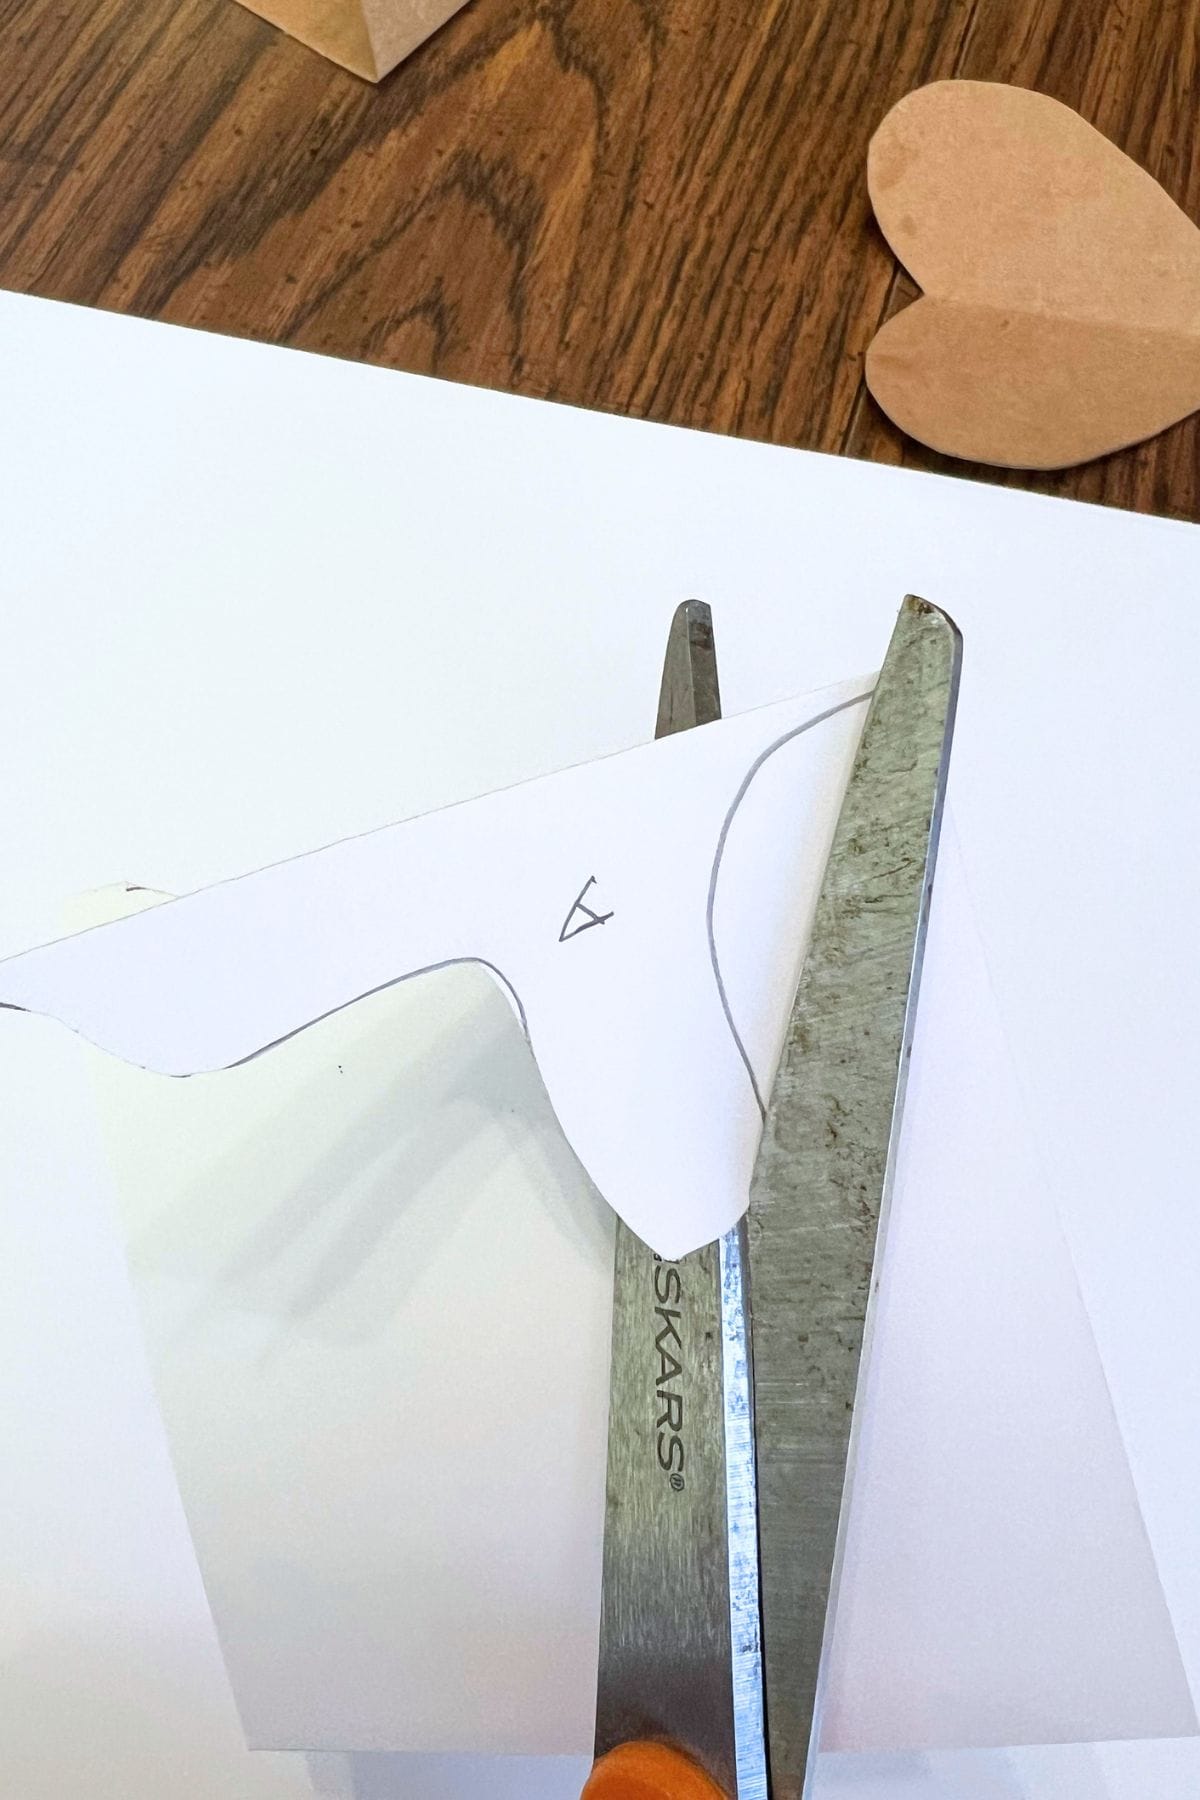
Step 2: Cut The Line To Make A Shape
Carefully cut along your line in one continuous cut. Keep the piece you remove, since you will use it to create your tessellation template.
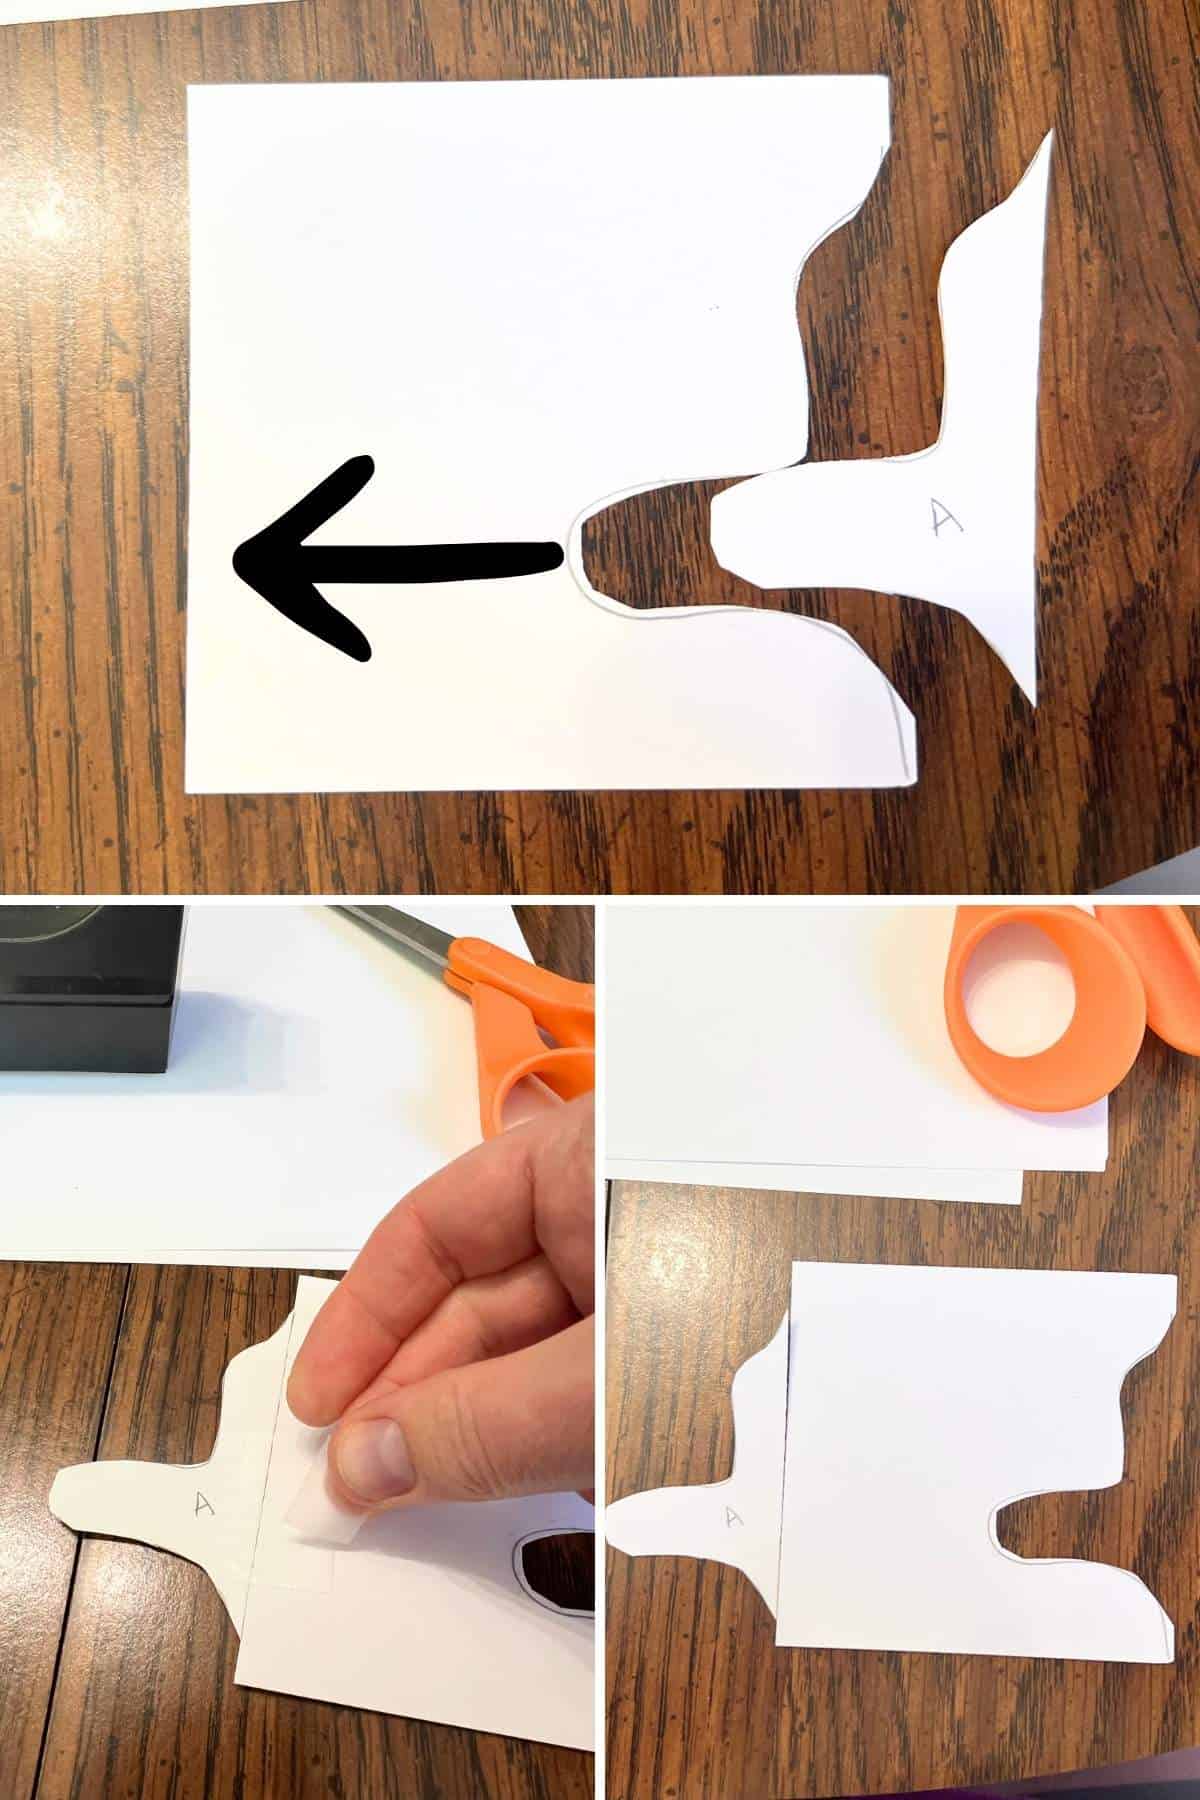
Step 3: Tape the Shape to the Left Side
Move the cut-out piece directly to the right side of your square without rotating or flipping it. Line up the original right side edge of the cut-out with the left edge of your square and tape it securely in place.
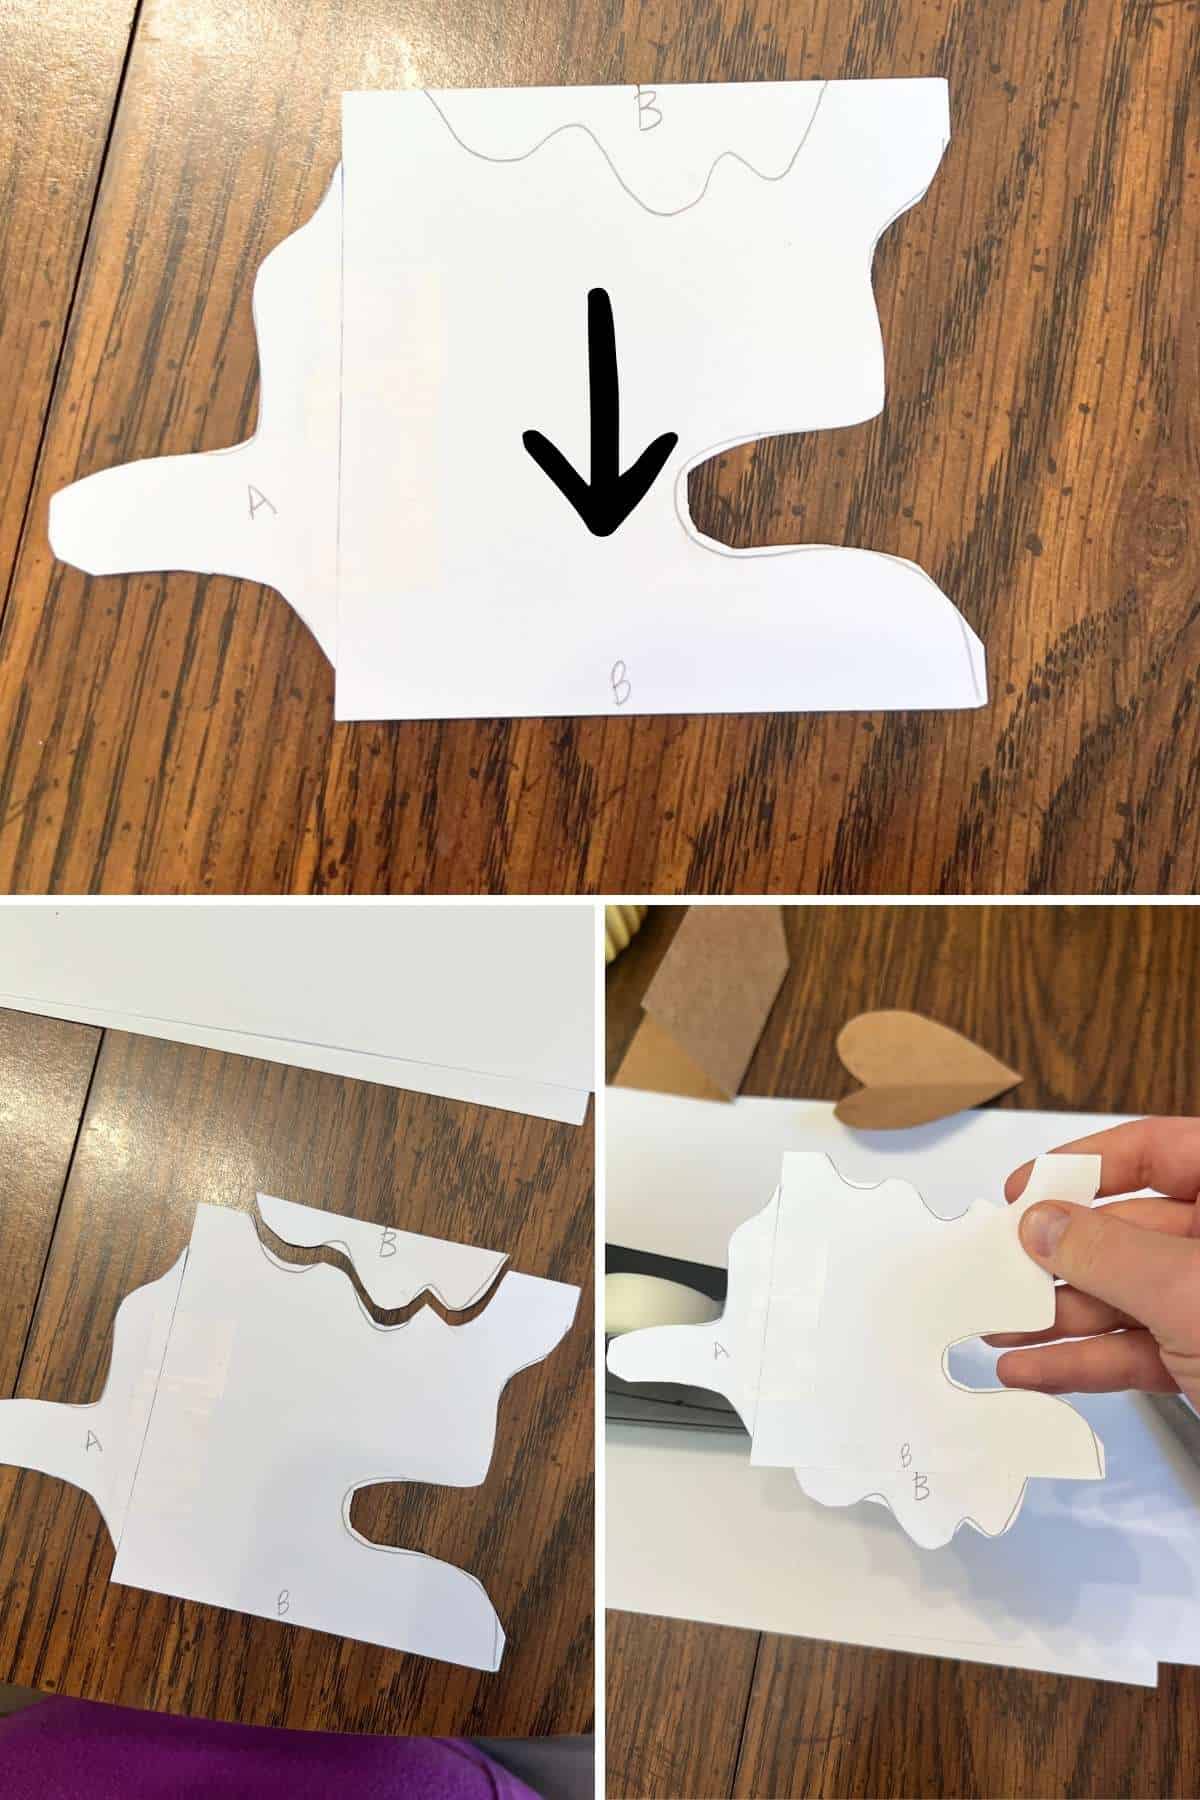
Step 4: Repeat on the Top and Bottom
Draw another simple line that starts and ends along the top edge of your new shape. Cut along the line and move that piece directly to the bottom without rotating or flipping it. Line up the edges and tape it in place.
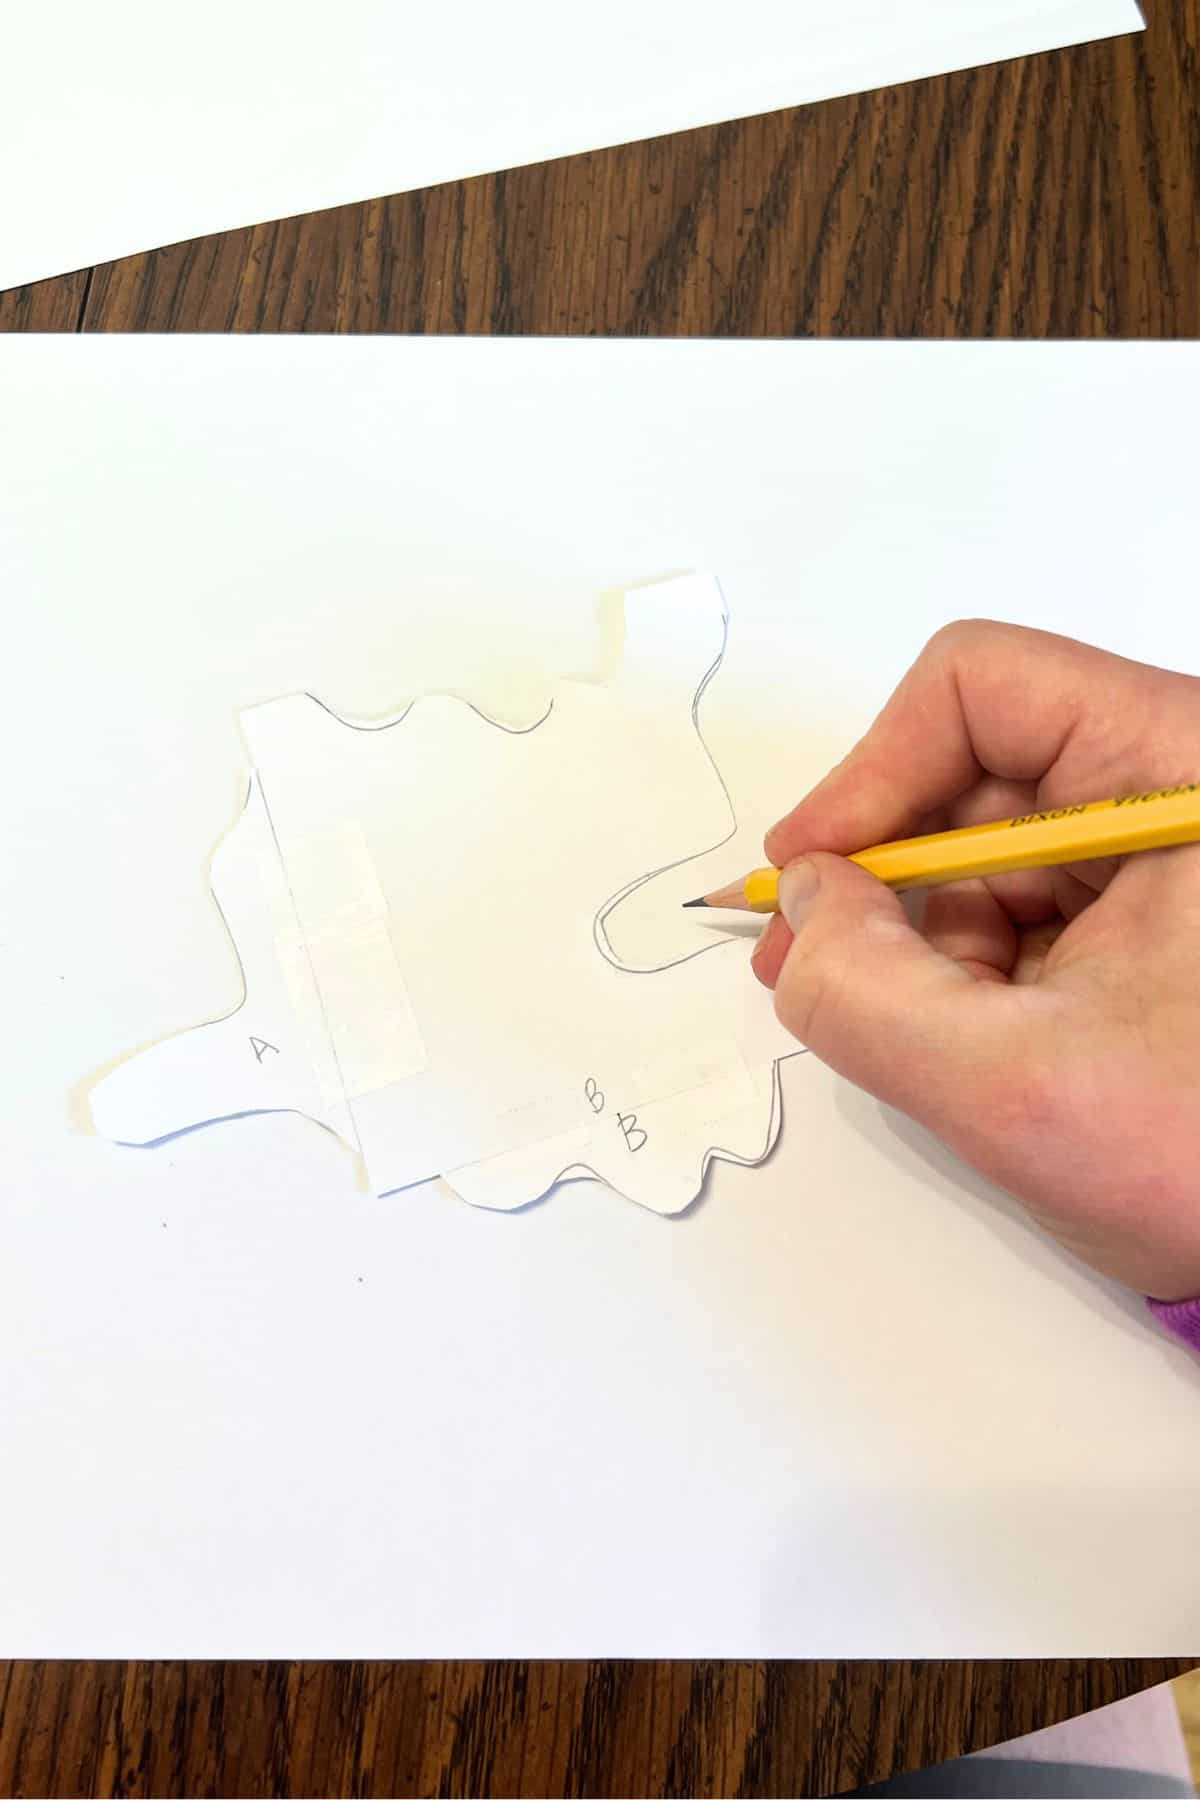
Step 5: Trace the Shape
Place your finished tessellation template near the middle of your 9″ x 12″ drawing paper. You can tilt it slightly before tracing to create a more interesting design. Carefully trace around the entire shape with a pencil.
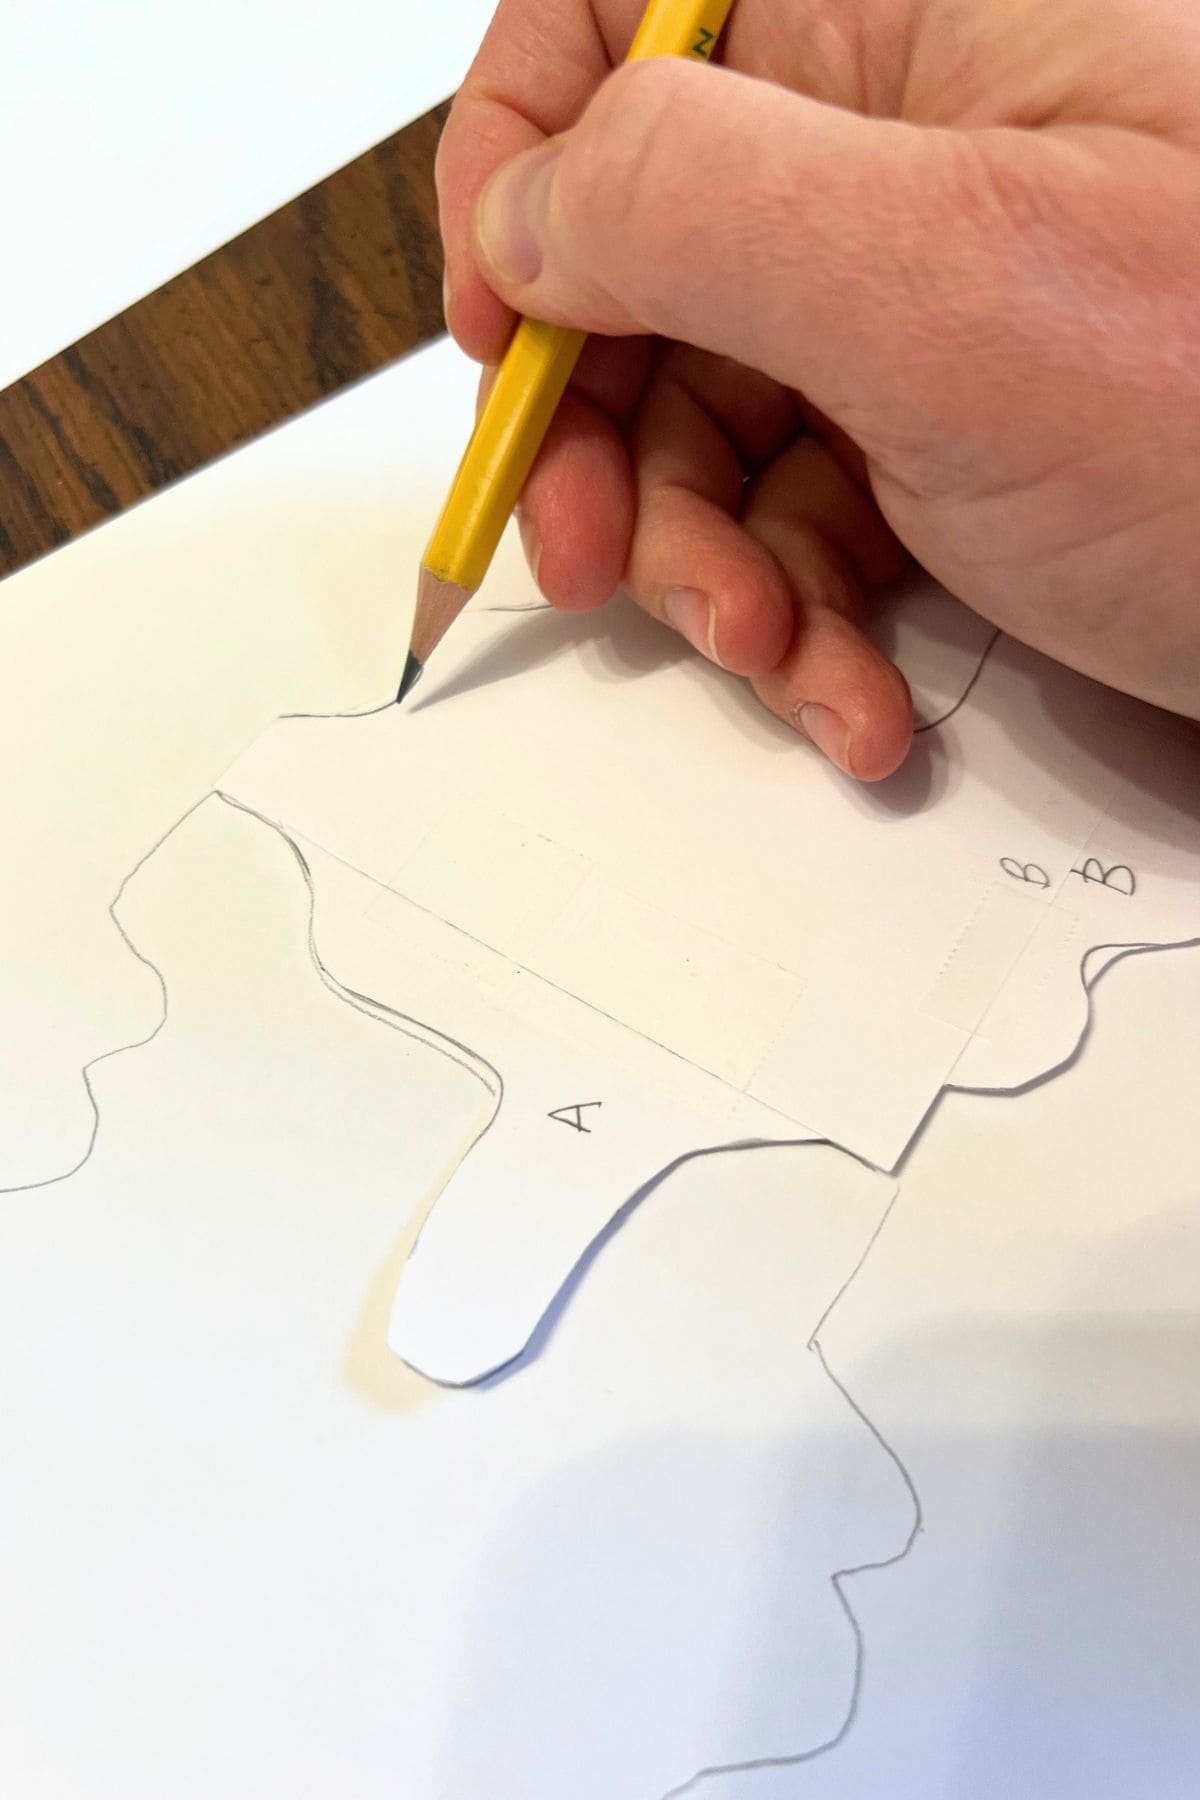
Step 6: Line Up and Trace the Shape
Slide your template next to the first tracing so the edges fit together like puzzle pieces. Keep the template facing the same direction. Since the shapes share one edge, you only need to trace the other three sides.
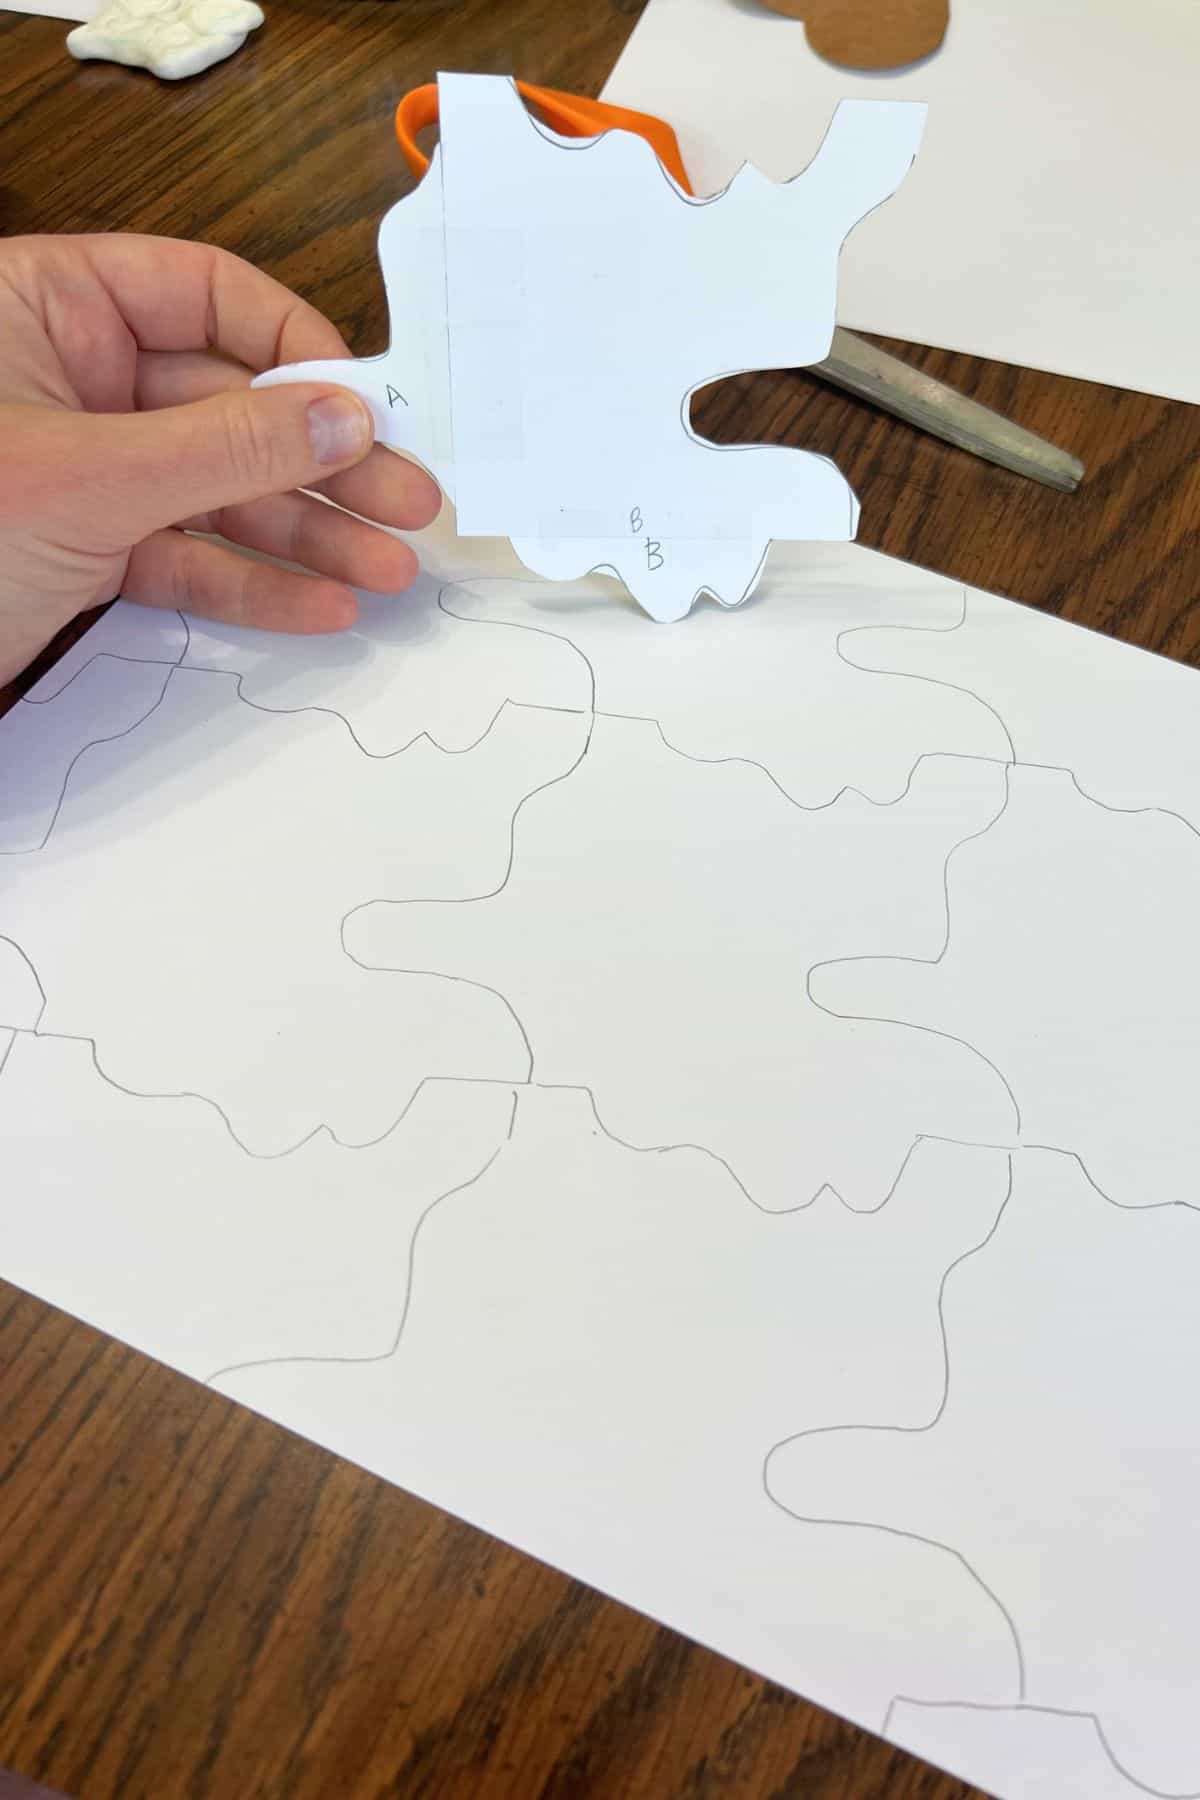
Step 7: Repeat To Fill The Paper
Continue moving and tracing your template until the whole paper is filled with repeating shapes. Some shapes will go off the edges of your paper, and that’s okay!
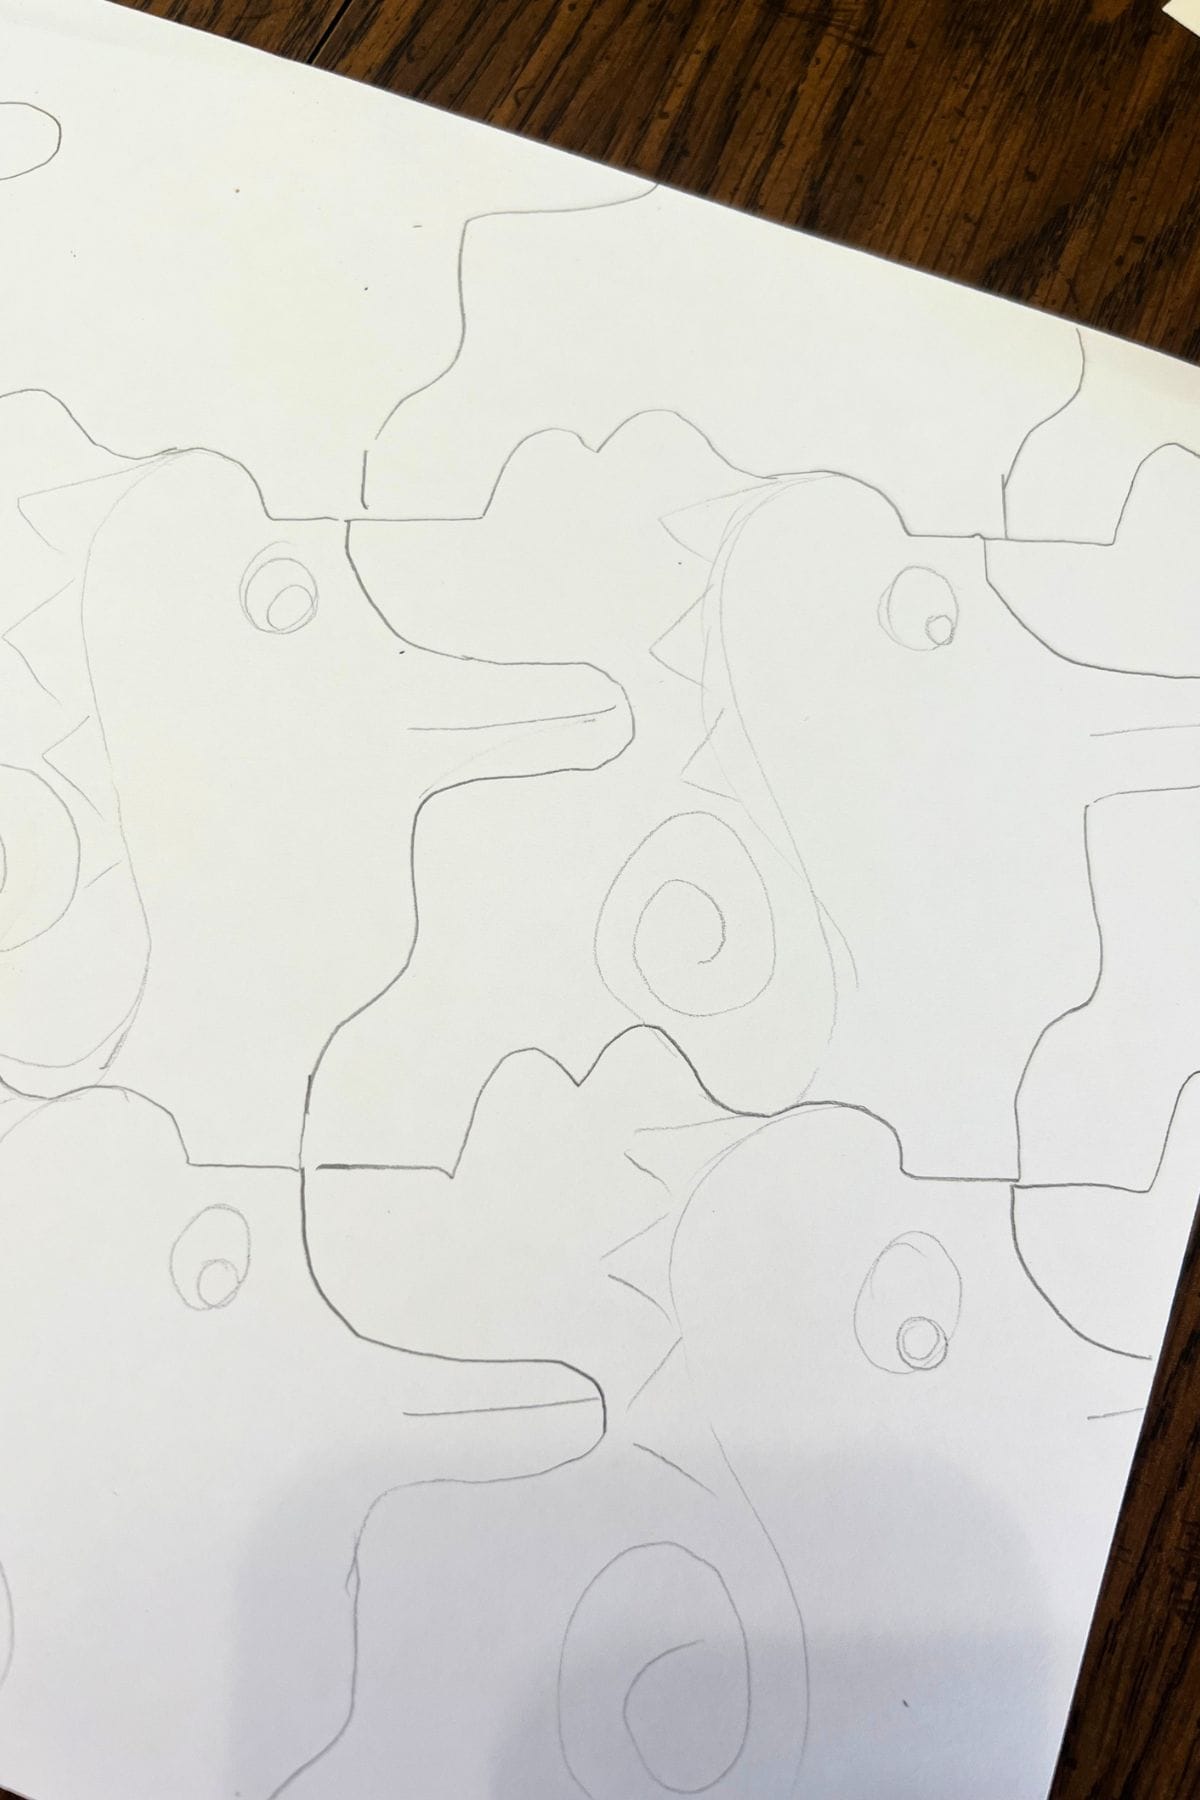
Step 8: Add Creative Details
Decide what you want to turn your tessellating shape into. You can practice drawing details on your template or a separate piece of paper first. Kids can create one design to repeat or alternate between two different designs to make a pattern.
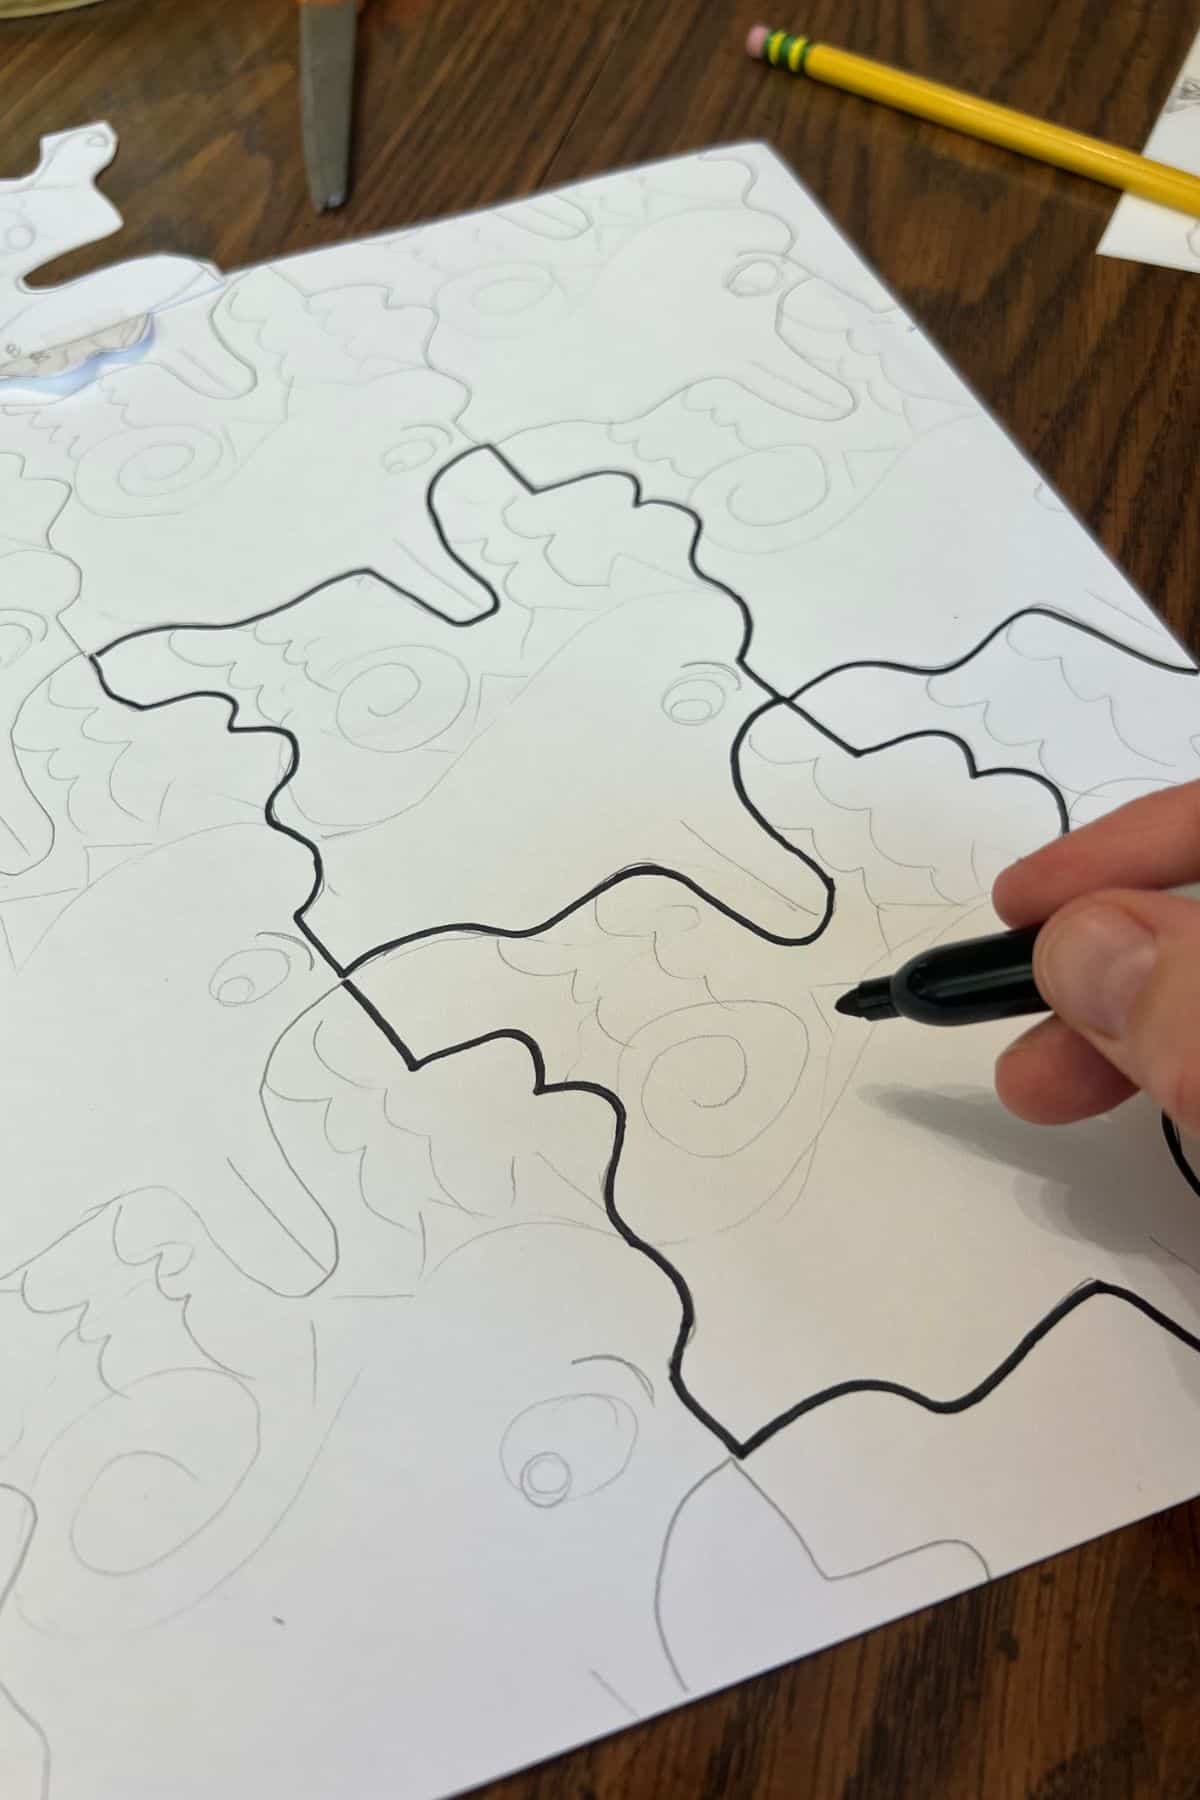
Step 9: Outline With a Permanent Marker or Pen
Carefully trace over your pencil lines and added details with a permanent marker or pen. Let the ink dry before erasing any extra pencil marks. For the main shapes, I like to have kids use a regular tip Sharpie to make the shapes stand out.
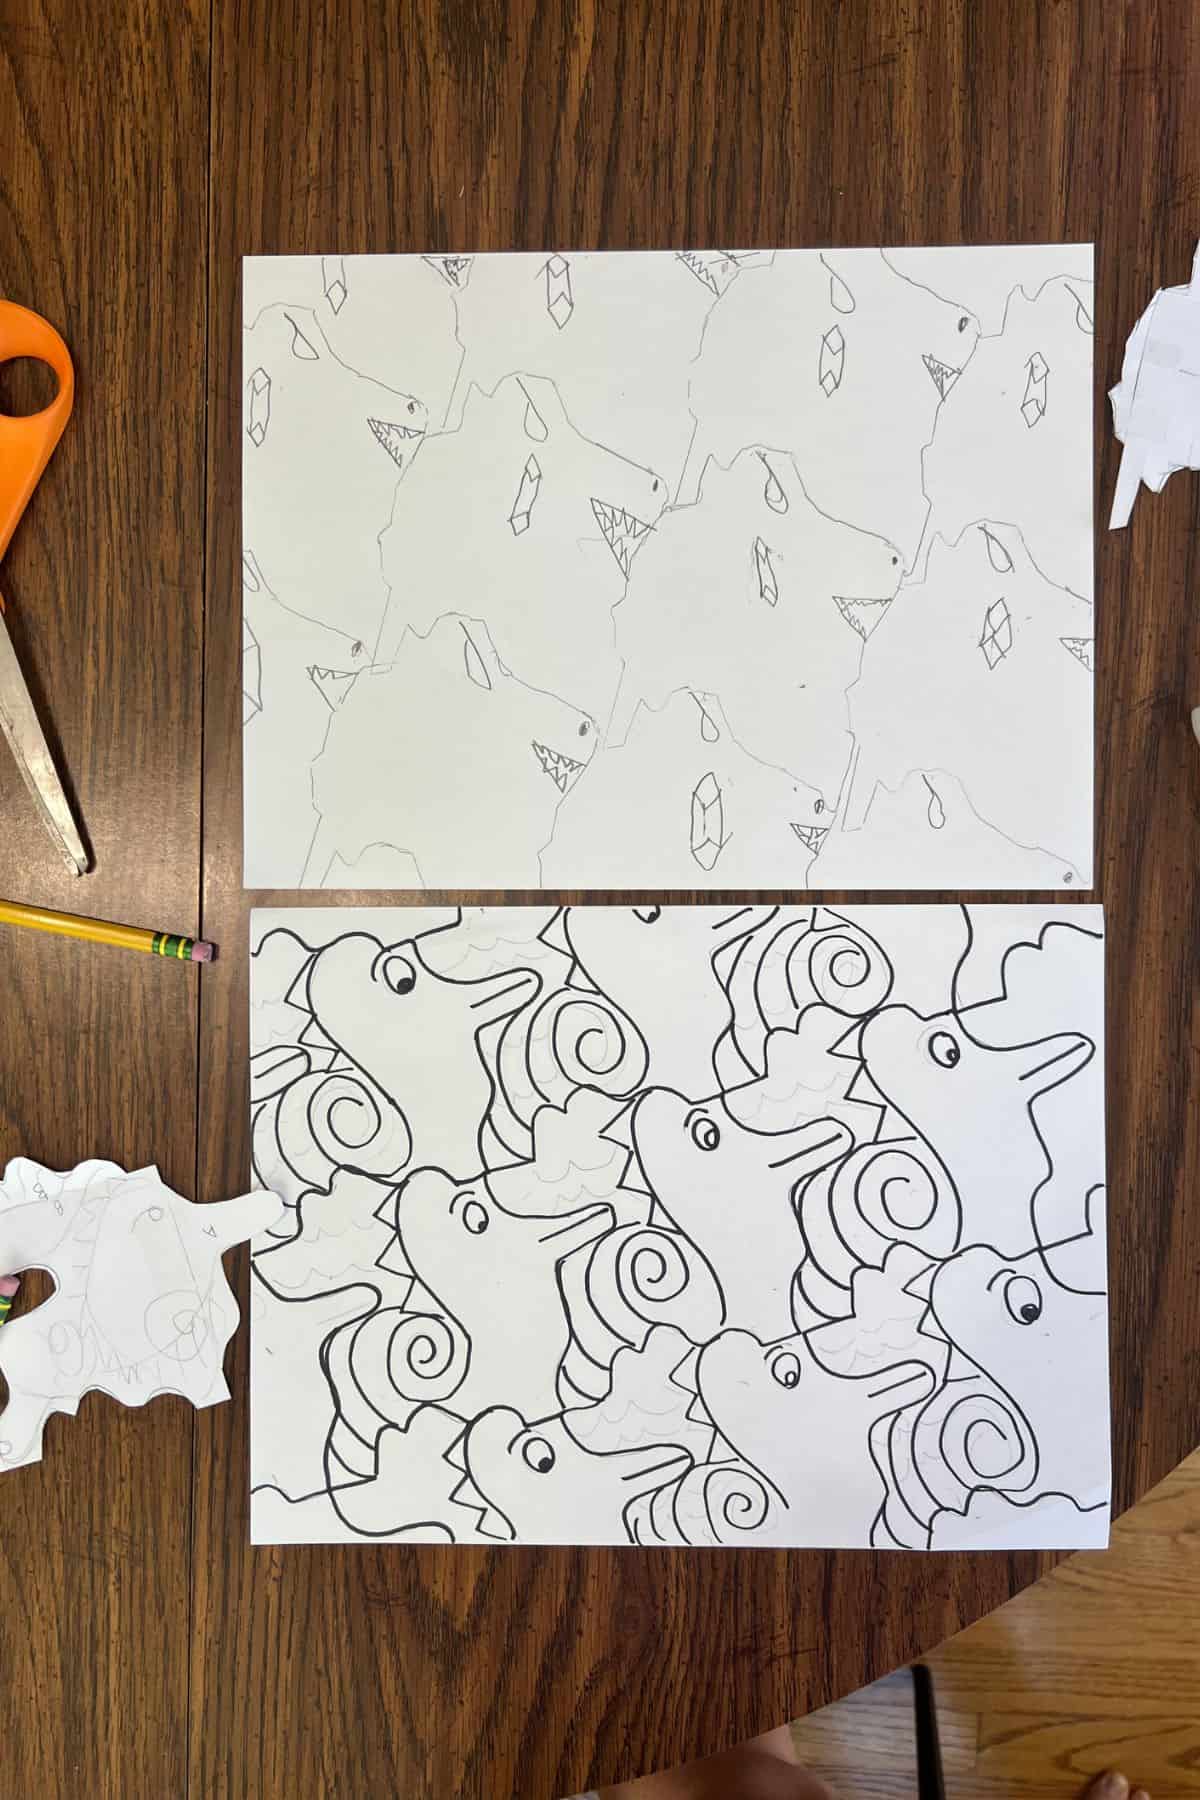
Step 10: Add Creative Details
Decide what you want to turn your tessellating shape into. You can practice drawing details on your template or a separate piece of paper first. Kids can create one design to repeat or alternate between two different designs to make a pattern.
Step 11: Color In A Pattern
Use your favorite drawing materials to add color to your tessellation. Encourage kids to repeat colors or alternate between different color combinations to create an interesting pattern.
Tips
- USE STURDY PAPER – A note card or lightweight cardstock will hold up better than thin paper when tracing the shape multiple times.
- KEEP YOUR TEMPLATE FACING THE SAME WAY – Slide the shape instead of rotating or flipping it so the pieces continue to fit together.
- TRACE CAREFULLY – Encourage kids to hold the template firmly and line up the edges before tracing. Small gaps can make the pattern harder to follow.
- PRACTICE BEFORE TRACING – Have kids test their template on scrap paper before starting their final drawing. This gives them a chance to see how the pieces fit together and make adjustments if needed.
- COULD ALSO USE WATERCOLOR PAINT – Once drawings are traced with a permanent black marker, painting may be quicker than drawing.
Frequently Asked Questions
I recommend this tessellation art project for fourth grade and older. Kids need to be able to cut and trace their shapes carefully to create a repeating pattern. Older students can also experiment with more complex drawings and details inside their shapes.
Squares, triangles, and hexagons are common shapes used in tessellations. For this project, kids start with a square and change its edges to create a unique shape that can repeat without gaps or overlaps.
Yes! Kids can create abstract tessellations using repeating shapes, lines, and colors. Not every tessellation needs to look like an animal or recognizable object.
A pattern is any design that repeats. A tessellation is a special type of repeating pattern where shapes fit together without gaps or overlaps.
Our Favorite
Related Drawing Projects
While this tessellation drawing takes a little practice and patience, creative kids who love to draw will really enjoy it! Once they learn how to make their own tessellating shapes, they can try this project again and again at home or in the classroom. Each new design can lead to a completely different piece of art.
Tessellation Art Project for Kids
Equipment
- Scissors
- Tape
Supplies
- 1 3" x 3" Post-it note or square note card
- Pencil
- Drawing paper
- Markers colored pencils, or crayons
- Optional: Permanent marker or pen
Instructions
- BEFORE YOU BEGIN: Cut note cards into 3" x 3" squares if you are not using square Post-it notes. Have drawing paper and other materials ready. Consider showing students examples of M.C. Escher's tessellations before starting.
- DRAW A LINE ON THE LEFT SIDE: Draw a simple curved or angular line that starts and ends on the same left edge of your Post-it note. Make sure the line does not cross over itself.
- CUT OUT THE SHAPE: Carefully cut along your line in one continuous cut. Keep the piece you remove.
- TAPE TO THE OPPOSITE SIDE: Move the cut-out piece directly to the right side without rotating or flipping it. Line up the original left edge of the cut-out with the right edge of your square and tape it securely.
- REPEAT ON THE TOP AND BOTTOM: Draw another simple line that starts and ends on the top edge. Cut along the line and move that piece directly to the bottom without rotating or flipping it. Line up the edges and tape it in place.
- TRACE THE SHAPE: Place your finished template near the middle of your drawing paper. You can tilt it slightly before tracing. Carefully trace around the entire shape with a pencil.
- LINE UP AND TRACE AGAIN: Slide your template next to the first tracing so the edges fit together like puzzle pieces. Keep it facing the same direction and trace the remaining three sides.
- FILL THE PAPER: Continue moving and tracing the template until the whole paper is covered with repeating shapes. Some shapes will go off the edges of the paper.
- ADD CREATIVE DETAILS: Turn your shape into a recognizable object or abstract design. Practice on your template or scrap paper first. Repeat one design or alternate between two different designs.
- OUTLINE YOUR DRAWING: Carefully trace over your pencil lines and details with a permanent marker or pen. Let the ink dry before erasing extra pencil marks.
- COLOR IN A PATTERN: Use markers, colored pencils, or crayons to color your tessellation. Repeat colors or alternate between different color combinations.
Notes
- Use sturdy paper or lightweight cardstock to make a template that holds up to repeated tracing.
- Keep the template facing the same direction as you move it around the paper.
- Hold the template firmly and line up the edges carefully before tracing.
- Practice tracing the template on scrap paper before starting your final drawing.