Fun Chalk Name Art Lesson For Kids


Back-to-school is perfect for creating these glue and chalk name art projects. Kids will love drawing with glue and adding color to showcase their personalities.

This name art lesson is great for any aged child who can draw with a glue bottle. If you want to complete this name art with very young children, an adult could also draw each name beforehand.
Why You Will Love This Art Idea
Supplies you’ll need
Disclosure: We only recommend products we would use ourselves and all opinions expressed are our own. This post may contain affiliate links when clicked, we may earn a small commission at no additional cost to you. Read our full privacy policy.

*After years of experience with all sorts of black construction papers, this brand is a must. You can do this project with any size. Some examples in this lesson are 6″ x 9″ and 9″x 12″. For younger children (1st graders and younger might even do best on 12″ x 18″ paper).
Chalk and Glue Name Art Tutorial

Step 1: Sketch Out Your Name Design
We recommend that kids sketch out their name design using a pencil first. They can create bubble or block letters or sketch their name regularly.
See our tips for creating bubble and block letters with children here.
Step 2: Outline The Drawing With Glue
If writing their name, we recommend going over the lines twice with a glue bottle to make their name stand out.
Step 3: Let Dry
Depending on the thickness of the glue line, it may take a few hours to completely dry.
Step 4: Add Color
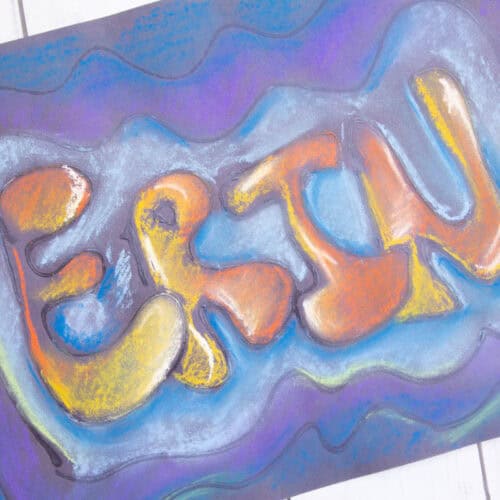
Our favorite way to add color to glue drawings on black paper is with chalk pastels. The glue resists the chalk and acts like an outline.

To make the names stand out, we recommend:
- Picking warm or cool colors for the inside of your letters and the opposite colors on the outside.
- You can also limit the colors inside the letters and use contrasting colors in the negative space.
Step 5: Spray Drawings
If you are using chalk pastels, it is best to spray them with a workable fixative.

Follow us on Pinterest, YouTube & Facebook for more free art and craft ideas!
Tips
- School glue works well but may not have as much relief as you would like.
- Glue-All is a thicker glue that doesn’t spread out as much. This is an excellent option for older kids because it is not as washable.
- Make sure to lay your glue drawings completely flat to dry. Most drying racks have a tilt, and the drawings will drip or smear.
- Practice using oil pastels or chalk pastels before working on the project.


More Unique Drawing Projects
Use glue, chalk or paint in these other fun project ideas!
- EASY FOR ALL: Jim Dine Inspired Heart Drawings
- CANVAS IDEA: Drawing With Glue On Canvas
The best part about this fun chalk name-drawing project is that you can modify it to fit your style or your student’s abilities.
How To Make Chalk Name Art
Equipment
Supplies
- Black construction paper
- White school glue
- Chalk pastels
- Pencil
Instructions
- BEFORE YOU BEGIN: Have kids lightly sketch their names in large letters before adding glue. Simple block or bubble letters work well and leave plenty of space for adding color.
- DRAW YOUR NAME: Lightly draw your name in large letters on black construction paper.
- TRACE WITH GLUE: Carefully trace over the pencil lines with white school glue. Let the glue dry completely before adding chalk.
- ADD CHALK PASTELS: Choose between warm and cool pastel colors and add color around the dried glue lines. Use the opposite color scheme in the negative space.
- BLEND THE COLORS: Use your fingers to gently blend and smudge the chalk pastels. Experiment with different color combinations as you work.
- ADD MORE DETAILS: Continue adding and blending chalk until you are happy with your design. Add extra lines, shapes or patterns if desired.
- PROTECT THE ARTWORK: Carefully shake off excess chalk dust. Display the finished artwork as is or have an adult use an appropriate fixative to help reduce smudging.
Notes
- Draw the name large enough to fill most of the paper. Let the glue dry completely before using chalk pastels.
- Encourage kids to experiment with blending colors instead of trying to make every section look the same.
- Use one finger or paper towel to gently blend chalk pastels.
- Chalk pastels can be messy, so protect tables and work surfaces before beginning.
- Avoid blowing chalk dust off the artwork.