
How To Make Easy Leaf Prints With Paint (10 Minute Art Idea)


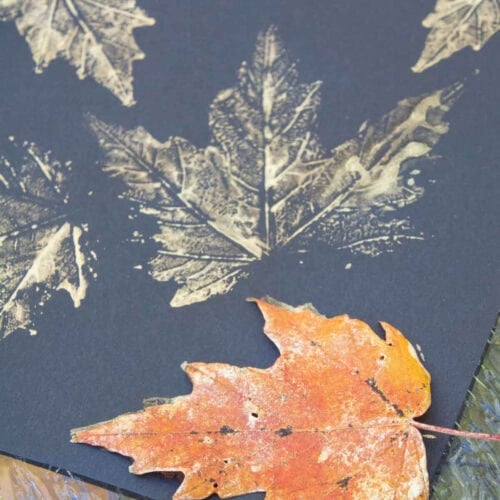
Leaf printing with paint can be done in so many different ways. This is one of our favorite fast and easy ways to turn real leaves into art. We used metallic gold paint on black paper, but you can easily try different color combinations. Best of all, you can complete this simple printmaking process in 10 minutes or less!

Updated September 2026: We added clearer step-by-step instructions, helpful leaf printing tips and more project ideas.
Why You Will Love This Art Process
Supplies You’ll Need
Disclosure: This post may contain affiliate links when clicked, we may earn a small commission at no additional cost to you. Read our full privacy policy.
Supply Tips
- We only use this brand of construction paper because it does not fade as quickly as other brands.
- You can also purchase this fun 18-pack of metallic craft paints for various projects.
- Tempera paint also works well for this project with young children. Due to the chalky nature of tempera, most colors will stand out on the black paper.

Leaf Printing With Paint Tutorial
Step 1: Find The Right Leaves
Searching for the right leaves is essential (just like our marker print leaf art project). Whole, flat, fresh, or newly fallen leaves with pronounced veins will work best.
For your leaf art, stay away from leaves that are too dry. It will be hard to get a good leaf impression on paper.

Step 2: Paint The Textured Side Of The Leaf
Paint the underside of the leaf where the veins are the most raised and noticeable. To get the cleanest print, check that there are no large globs of paint.
Step 3: Print The Leaves
One at a time, place the painted side of the leaf down on your paper. Cover the leaf with a piece of scrap paper or a paper towel and carefully press over the entire leaf.
Step 4: Remove The Leaf and Let Dry
You can carefully lift the leaf once you think the whole leaf impression is on the paper. Be careful not to smudge the wet paint!
Tips
- You may be able to reuse a painted leaf to get a few prints.
- Press, don’t rub your leaf. This will keep your leaf impressions looking crisp.
- You can add other drawings and paintings or incorporate them into a mixed-media project.
- Cover your work surface with extra paper. Before printing, make sure you paint the whole leaf surface.
- Keep your hands clean to avoid adding extra smudges to your leaf artwork.

Follow us on Pinterest, YouTube & Facebook for more free art and craft ideas!
FAQs
More
Related Nature Art Projects
The fun part about leaf printing is experimenting with the leaves and art supplies you already have. Try different shapes, sizes and paint colors to see what types of prints you can create. Go on a family leaf hunt, pick your favorites and start printing!
How To Make Leaf Prints With Paint
Equipment
- Scrap paper or a protected work surface
Supplies
- Fresh or newly fallen leaves
- Metallic gold acrylic paint can also use tempera paint
- Black paper
Instructions
- BEFORE YOU BEGIN: Look for whole, flat leaves with noticeable veins. Fresh or newly fallen leaves work best because leaves that are too dry may crack or break when pressed.
- FIND THE RIGHT LEAVES: Choose whole, flat leaves with noticeable veins. Avoid leaves that are too dry or brittle.
- PAINT THE TEXTURED SIDE: Flip the leaf over so the underside with the raised veins is facing up. Use a paintbrush to completely cover this side with a thin layer of paint.
- PRINT THE LEAF: Carefully place the painted side of the leaf down on the paper. Gently press over the entire leaf with your fingers to transfer the paint.
- REMOVE THE LEAF: Slowly lift the leaf straight off the paper to reveal your print. Let the paint dry completely before touching it or adding more details.
Notes
- Don’t use too much paint. A thin, even layer will help the leaf’s veins and details show.
- You may be able to use the same painted leaf for a few prints.
- Try different leaf shapes and sizes to create a variety of prints.
- While we used metallic gold acrylic paint on black paper, you can experiment with other paint and paper color combinations.