Pressed Flower Clay Ornaments
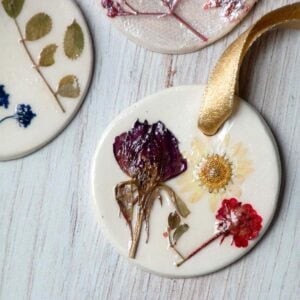
Make beautiful pressed flower clay ornaments using air-dry clay, acrylic paint, and Mod Podge. This easy clay craft is perfect for handmade gifts and holiday decorations.
Print Tutorial
Equipment
- Rolling Pin or Bottle
- Cookie cutters or circular lid
- Straw or wooden skewer
- Paintbrushes or small foam brush
- Work surface
- Small container of water
- Optional rolling guides and tweezers
Supplies
- Air-dry clay
- Dried pressed flowers
- Acrylic paint
- Clear Mod Podge
- Ribbon or twine
- Optional clear gloss sealer
Instructions
- BEFORE YOU BEGIN: Make sure your pressed flowers are completely dry. Gather your supplies and choose the shapes you want to make. Plan to roll the clay approximately 1/4 inch thick.
- ROLL OUT THE CLAY: Use a rolling pin and rolling guides to flatten air-dry clay into an even slab approximately 1/4 inch thick.
- CUT THE SHAPES: Use cookie cutters or a lid to cut ornament shapes. Remove the extra clay and smooth rough edges with a little water.
- ADD A HANGING HOLE: Use a straw or skewer to make a hole near the top of each ornament.
- LET THE CLAY DRY: Place the ornaments on a flat surface and allow them to dry completely according to the clay package directions.
- PAINT THE ORNAMENTS: Add acrylic paint to the dry clay ornaments. Let the paint dry completely.
- ADD MOD PODGE: Brush a thin layer of Mod Podge where you want to attach the flowers.
- ARRANGE THE FLOWERS: Carefully place the pressed flowers onto the Mod Podge and gently press them into place.
- SEAL THE DESIGN: Once the first layer is dry, brush another thin layer of Mod Podge over the flowers and painted surface.
- ADD EXTRA SHINE: If desired, apply a compatible clear gloss sealer after the Mod Podge has dried completely.
- ADD RIBBON: Thread ribbon or twine through the hanging hole and tie a loop.
Notes
- Keep your clay an even thickness to help prevent uneven drying.
- Don't overcrowd the ornaments with too many flowers.
- Allow the clay, paint, and Mod Podge to dry completely between steps.
- Leave enough clay around the hanging hole to prevent breakage.
- White air-dry clay can be left unpainted for a natural background.
- Drying times vary depending on the clay brand, thickness, and conditions.
- Test optional clear gloss sealers before applying them to finished ornaments.
Tried this Crafty Art Idea?Please consider Leaving a Review!
Cost: under $5