How to Make Patterned Clay Pumpkin Sculptures
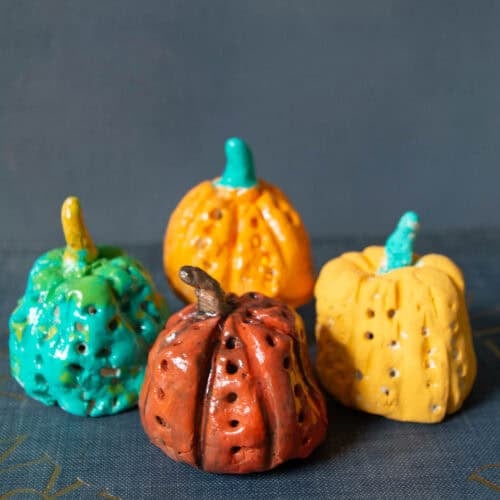
Learn how to make a hollow clay pumpkin using two pinch pots. Add texture, a stem and colorful repeating patterns inspired by Yayoi Kusama.
Print Tutorial
Equipment
- Wooden skewer or clay tool
- Paintbrushes
- Work surface
Supplies
- Crayola Air-Dry Clay or regular ceramic clay
- Water
- Acrylic paint for air-dry clay
- Ceramic glaze for ceramic clay
- Optional Clear Sealer
- Battery-operated tea light optional
Instructions
- BEFORE YOU BEGIN: Decide whether you are using air-dry or ceramic clay. The building process is similar, but drying and finishing will be different. Have kids look at examples of Yayoi Kusama's colorful pumpkin artwork and repeating patterns for inspiration.
- DIVIDE AND ROLL THE CLAY: Divide a handful of clay into two equal sections. Roll each piece into a smooth ball.
- MAKE TWO PINCH POTS: Press your thumb into the center of each ball without pushing through the bottom. Pinch and rotate the clay to create two similar-sized pinch pots with walls about 1/8 to 1/4 inch thick.
- SCORE THE EDGES: Use a wooden skewer or clay tool to scratch the rim of each pinch pot where the two pieces will connect.
- ADD WATER OR SLIP: Lightly rub water over the scored edges when using air-dry clay. Use clay slip when working with ceramic clay.
- JOIN THE PINCH POTS: Press the two scored rims together. Smooth and blend the seam until the two pinch pots form one hollow clay sphere.
- ADD A VENT HOLE: Poke a hole completely through the bottom of the pumpkin and into the hollow center. For an optional luminary, make the opening large enough to fit a battery-operated tea light.
- CREATE THE PUMPKIN TEXTURE: Use the side of a wooden skewer or clay tool to gently press lines into the clay to create the pumpkin sections. Press instead of drawing across the surface.
- ADD A STEM AND DETAILS: Create a stem, leaves or other clay details. Score and add water or slip before attaching each piece.
- ADD A REPEATING PATTERN: Use the end of a wooden skewer to press dots or other repeating patterns into the clay. Encourage kids to experiment with the size and placement of their patterns.
- LET THE CLAY DRY: Allow air-dry clay to dry completely, usually 24 to 72 hours or longer for thicker areas. Ceramic clay should become completely bone dry before bisque firing.
- ADD COLOR: Paint completely dry air-dry clay with acrylic paint.
- ADD A PAINT WASH (optional): Dilute black acrylic paint with water, add paint on top of the design. Wipe or dab away excess paint.
- APPLY CLEAR GLAZE: For extra protect and shine, apply a clear gloss layer. Let the pumpkin fully dry.
- DISPLAY YOUR PUMPKIN: Let all paint, sealer or glaze completely dry or finish firing before displaying. Add a battery-operated tea light if you created a larger opening in the bottom.
Notes
- Keep clay walls approximately 1/8 to 1/4 inch thick.
- Use only a small amount of water when working with air-dry clay.
- Score and add water or slip anytime you attach two pieces of clay.
- Make sure the vent hole reaches the hollow center.
- Allow the clay to dry completely before painting or firing.
- Don't worry about creating a perfectly round pumpkin. Uneven shapes add personality.
- Use only battery-operated tea lights inside finished pumpkins.
Tried this Crafty Art Idea?Please consider Leaving a Review!
Cost: under $5