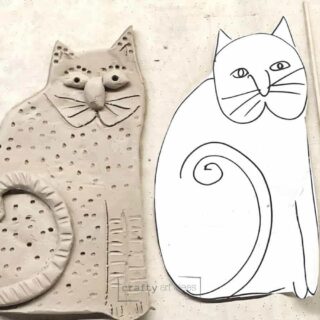
Clay Cat Art Project
Learn how kids can make this easy clay slab art project. This art lesson is perfect for elementary-aged children. Use Laurel Burch as inspiration for your students.
Print Tutorial
Equipment
- Kiln
- Wooden Skewer
- Clay Placemat
- Small container of water
Supplies
- White Art Clay Low Fire
- Oil Pastels
- Black Acrylic Paint
- Wooden Skewer
Instructions
- Either pre-create each slab for the students or give each child a ball of clay.
- Create a slab by using a rolling pin to make a pancake large enough to fit the cat template.
- Place template on even clay slab.
- Use a wood skewer to cut around the cat template and pull the extra clay off the slab.
- Roll a coil to be used as a tail.
- Use score lines on the parts that you are attaching and use one finger dipped in water to “make fake clay slip”.
- Create other relief parts of the cat. Score, add water and attach.
- Use a skewer or needle tool to draw other details and patterns.
- Let dry. We like to let kid clay projects dry for about a week. However these are thin, so you probably could get away with them drying in 4 days. Just make sure they are not cool to the touch.
- Run a bisque fire in your kiln according to the clay you order.
- Add color by glazing, painting or even using oil pastels.
Notes
- An adult should carefully write the names on the back of the clay cats with a needle tool.
- An adult or teacher can have the slabs premade or can teach children how to make their own slab before beginning to form their clay cat.
Cost: Less than $5