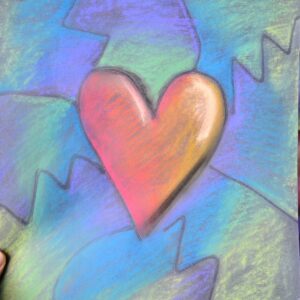
Chalk Pastel Heart Drawings
Learn how to create a fun and easy chalk pastel drawing. This art project is a perfect beginner chalk pastel lesson.
Print Tutorial
Equipment
- 12" x 18" Extra Paper
- Blending Stump optional
- Pencil optional
- Workable Fixative or Hair Spray
Supplies
- Chalk Pastels we used Nu-pastels
- 9" x 12" Tru-Ray Black Construction Paper
- Glue Bottle
Instructions
Draw With Glue
- Use a glue bottle in the center of your page to create a large heart.
- Add 8-10 zigzag, straight or wavy lines radiating out from the heart.
- Place drawings on a flat surface to fully dry.
Use Chalk Pastels
- Choose warm (reds, oranges, yellows, pinks) or cool colors (blues, green, violets) for your background.
- Lightly color with chalk pastels. You do not need a ton of color to get a fun look. Work with an extra paper under projects to help with the mess.
- Use your finger to blend the colors in the background.
- Use the opposite colors inside the heart. Lightly add the warm or cool colors inside the heart. Overlapping colors will create a fun new color when you blend.
- Blend heart colors with finger, blending stump or paper towel.
- Use a white pastel to add a crescent shape on one side of the heart. You also add it to the edge of the top.
- Add shadows with black chalk pastels and blend with your finger.
- Spray your drawings with hair spray or workable fixative.
Notes
- We love when there is a variety of heart shapes and sizes. Encourage each drawing to be unique.
- Encourage only using one finger to blend chalk pastels and lightly coloring to not make too much dust. This will help children not be a complete mess.
- Any bottled glue will work, but Glue-All will give your more texture.
- You can use a workable fixative or hair spray to seal drawings when finished.
- We also recommend sending this art home in a paper folder to help limit smudging.
Cost: under $10