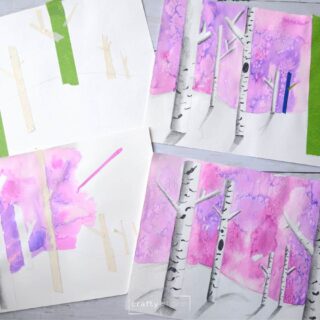
Easy Winter Landscape Painting Idea
Create beautiful birch tree winter landscape paintings. This art lesson is perfect for all different skill levels.
Print Tutorial
Equipment
- Pencil
- Blending Stump (optional)
Supplies
- Watercolor Paper or Heavy Drawing Paper
- Ultra Fine Permanent Marker
- Liquid Watercolor Paint colors of your choice
- Salt
- Masking Tape or Painter’s Tape
Instructions
- Draw a horizon line as lightly as possible on 12 x 18” watercolor paper. I always say “draw light until you get it right”.
- Show students how to add larger trees closer to the bottom of the page and the smallest trees closer to the horizon line.
- Make 5-7 trees in a variety of sizes by taping them on watercolor paper.
- Add branches by ripping the tape to create more realistic-looking tree branches.
- Use a wet-on-wet watercolor technique to help the colors blend in the sky. Show wetting the paper before adding paints.
- Work in sections and add salt to the winter landscape skies before the paint starts to dry.
- Once paintings are dry, begin to take the tape off.
- Add shading to one side of each tree. Continue on all tree trunks.
- Add a cast shadow at the base of each tree with a pencil.
- Use an ultra-fine permanent marker to create unique birch tree designs.
Notes
-
- Try to keep the paint above the horizon line so that you still have white snow.
- Place paintings in a flat spot to completely dry.
- Always point out how each artistic choice is unique for the artist. From learning about how to create a foreground, middle ground and background to a wet-on-wet watercolor technique this art project covers a lot of concepts within a short amount of time.
- Only allow 5 pinches of salt
-
- Demonstrate and act out size variation by actually using your body and hands so kids understand
- Look at real trees for inspiration and notice that branches are skinnier than trunks
Cost: Less than $5