Easy Thumbprint Snowman Ornaments For Kids
This easy clay snowman idea is perfect for homemade winter decor. Children love making these clay thumbprint ornament ideas.
Print Tutorial
Equipment
- Small container of water
- Rolling Pin
- Wooden Skewer
Supplies
- White Clay
- Circle item like an old cup or cookie cutter
- Work surface or Clay Mat
- Watered Down Blue Acrylic Paint
- White Crayon optional
- Clear Coat We used Glitter Mod Podge for our ornaments
- String
Instructions
- Start with a small clay circle slab. The child should use his/her finger and dip in the water. Rub the water around the edge of the circle to make it smoother.
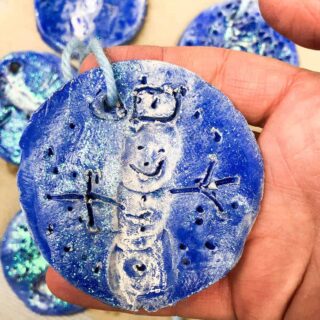
- Kids will then take their thumbs and push in three thumbprints that are touching. This makes the snowman’s body.
- Each child will get a wooden skewer to draw in snowman details such as eyes, nose, scarf, buttons and a hat.
- You can even flip over the skewer to stamp in snowflakes around the snowman.
- Take the clay ornament and write the child's name on the back with a wooden skewer or needle tool.
- Let dry until not cool to the touch.
- Run a kiln for a bisque fire.
- Use a white crayon to color the snowman.
- Paint watered down blue acrylic or tempera paint on the whole clay ornament. Even getting the sides.
- Rinse the project under the sink so that the white crayon resists where the paint was.
- Add a layer of glitter Mod Podge to seal the project.
- Let dry and add a string to hang their thumbprint clay snowman wherever they want.
Notes
Tips for Adding Color To Clay
- Make sure kids press hard enough with the white crayon
- Use your finger to help get the excess paint off when running it under the sink
- Paint the edges of the project
- Don't worry about what it looks like at first. In the picture below you can see how we covered the whole snowman before rinsing it.
- If you don't like what it looks like, you can always try again or just paint over it.