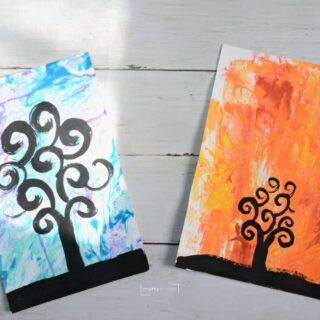
Tree Of Life Art Project
Kids will love this easy painting project inspired by Gustav Kilmt's, Tree Of Life paintings.
Print Tutorial
Equipment
- Paintbrush
- Paint Palette or Plate
Supplies
For Shaving Cream Prints
- Shaving Cream Liquid Watercolor or Acrylic Paint
- Cardboard Scraper
- Tray, Bin or Cookie Sheet
- 1 piece 9" x 12" Heavy White Drawing Paper, Tagboard or Watercolor Paper
For Painting Tree Silouhettes
- Black Tempera Paint
Instructions
- Place shaving cream on a cookie sheet or tray.
- Smooth out with a spatula or cardboard so you have a thin layer bigger than your paper.
- Add drops of acrylic or watercolor paint.
- Swirl with a toothpick.
- Print your white paper.
- Remove and scrape off the paint and shaving cream mixture.
- Let paper marbled paper dry.
- Add a horizon line with a pencil about two inches up from the bottom of the page. Draw only the tree trunk.
- Use black tempera paint to paint the bottom of the ground, tree trunk and swirly tree branches of their choosing.
- Let the paintings fully dry.
Notes
- It is easier for children to just paint the swirly branches than try to trace their drawings. They always make them too complicated and it becomes too hard to paint.
- Some of my favorite trees are the small ones children chose to paint. In order to get a variety of trees offer children different-sized brushes to paint with.
- Our favorite way to make marbled shaving cream paper is actually with liquid watercolor paint.
Cost: under $5